Endereço
304 North Cardinal
St. Dorchester Center, MA 02124
Horas de trabalho
De segunda a sexta-feira: das 7h às 19h
Fim de semana: 10:00 - 17:00
Endereço
304 North Cardinal
St. Dorchester Center, MA 02124
Horas de trabalho
De segunda a sexta-feira: das 7h às 19h
Fim de semana: 10:00 - 17:00


Uma chave de desconexão solar é um dispositivo de segurança essencial exigido em todo sistema fotovoltaico para proteger instaladores, trabalhadores de manutenção e socorristas. De acordo com o Artigo 690.13 da NEC, todas as instalações solares devem incluir meios de desconexão prontamente acessíveis que permitam o isolamento completo do sistema das fontes de energia CC e CA. No entanto, muitos instaladores têm dificuldades com a seleção, o dimensionamento e os requisitos de posicionamento adequados da desconexão.
A confusão decorre de vários tipos de desconexão - CA versus CC, com fusível versus sem fusível, interruptores de quebra de carga versus interruptores isoladores - cada um servindo a diferentes propósitos dentro da arquitetura do painel solar. A escolha da chave seccionadora errada pode resultar em violações de códigos, falhas em inspeções ou, pior ainda, incidentes catastróficos de arco elétrico durante a manutenção. Compreender as classificações de tensão, a capacidade de interrupção e os locais de instalação adequados não é negociável para instalações seguras e em conformidade.
Muitos acreditam que uma única desconexão no painel de serviço principal satisfaz os requisitos da NEC, mas o Artigo 690.13 na verdade exige vários pontos de desconexão em todo o sistema. Os requisitos especificam locais de desconexão na saída do conjunto de CC, na entrada/saída do inversor e na interconexão com a rede elétrica - cada um com padrões específicos de acessibilidade e rotulagem. A falta de uma única desconexão obrigatória gera sérios riscos à segurança e violações do código.
Este guia abrangente cobre tudo o que os instaladores profissionais precisam saber sobre chaves seccionadoras solares: Requisitos da NEC, tipos e aplicações de desconexão, especificações técnicas, métodos de dimensionamento adequado, regras de localização da instalação, procedimentos de instalação passo a passo, erros comuns a serem evitados e protocolos de manutenção.
O National Electrical Code estabelece requisitos obrigatórios de desconexão para sistemas fotovoltaicos no Artigo 690. Essas normas existem para garantir que as instalações solares possam ser desenergizadas com segurança para manutenção, resposta a emergências e solução de problemas do sistema. A compreensão desses requisitos é a base para instalações solares seguras e em conformidade.
A norma NEC 690.13 exige que todos os sistemas fotovoltaicos incluam meios para desconectar todos os condutores não aterrados de todas as fontes de energia. Esse requisito se aplica aos lados CC e CA do sistema, criando vários pontos de desconexão em uma instalação típica. A desconexão deve ser adequada para as condições predominantes e ter classificações de interrupção de corrente suficientes para a tensão do circuito e a corrente disponível.
O requisito “prontamente acessível” significa que as chaves seccionadoras devem estar localizadas onde possam ser alcançadas rapidamente sem a necessidade de subir em obstáculos ou usar escadas portáteis. As chaves seccionadoras montadas em telhados a mais de 6,5 pés acima da superfície de apoio não atendem a esse requisito de acessibilidade. Toda chave seccionadora deve poder ser travada na posição aberta por meio de dispositivos que permaneçam no lugar, independentemente de a trava ser instalada ou removida.
As desconexões fotovoltaicas devem estar “à vista” do equipamento que controlam, definido como visível e a não mais de 15 metros de distância. Esse requisito de distância de visão garante que os funcionários da manutenção possam verificar a posição da desconexão antes de fazer a manutenção do equipamento. Quando as desconexões não puderem atender ao requisito de distância visual, devem ser implementadas disposições alternativas de travamento.
💡 Principais percepções: O requisito “prontamente acessível” da norma NEC 690.13 é frequentemente violado quando as desconexões são montadas muito alto ou em salas de equipamentos trancadas. Uma desconexão que requer uma escada para ser alcançada ou uma chave para ser acessada não passa no teste de acessibilidade e não será aprovada na inspeção.
O artigo 690.14 trata especificamente dos meios de desconexão CC para sistemas fotovoltaicos, exigindo uma desconexão na saída CC da fonte fotovoltaica. Essa desconexão deve ser instalada em um local de fácil acesso, fora ou dentro do edifício, mais próximo do ponto de entrada do circuito CC do sistema. Para sistemas com vários inversores, cada inversor requer seu próprio meio de desconexão de CC.
A desconexão CC deve ser agrupada com a desconexão CA quando ambas estiverem localizadas no mesmo ponto. Esse requisito de agrupamento evita confusão durante desligamentos de emergência, quando os socorristas precisam isolar rapidamente todas as fontes de energia. A rotulagem adequada que identifica a função de cada seccionador é obrigatória quando vários seccionadores são agrupados.
Os inversores interativos de utilidade pública exigem uma etiqueta de advertência permanente na desconexão CC, indicando que os contatos nos lados da linha e da carga podem estar energizados na posição aberta. Esse aviso aborda o perigo exclusivo dos sistemas CC, em que tanto o painel solar quanto os capacitores do inversor podem manter a tensão letal mesmo quando a desconexão está aberta.
A norma NEC 690.15 exige que os meios de desconexão de equipamentos sejam fornecidos para desconectar inversores, controladores de carga e outros equipamentos de todos os condutores não aterrados de todas as fontes. Essas desconexões de equipamentos têm uma finalidade diferente das desconexões do sistema abordadas em 690.13 - elas permitem o isolamento de componentes individuais para manutenção sem desligar todo o conjunto.
As desconexões do equipamento devem estar localizadas à vista do equipamento ou podem ser travadas na posição aberta. No caso dos inversores, os meios de desconexão devem desconectar o inversor de todas as fontes de energia - tanto a entrada CC da matriz quanto a saída CA para a concessionária. Muitos inversores modernos incorporam chaves de desconexão integrais que atendem a esse requisito quando adequadamente classificados e acessíveis.
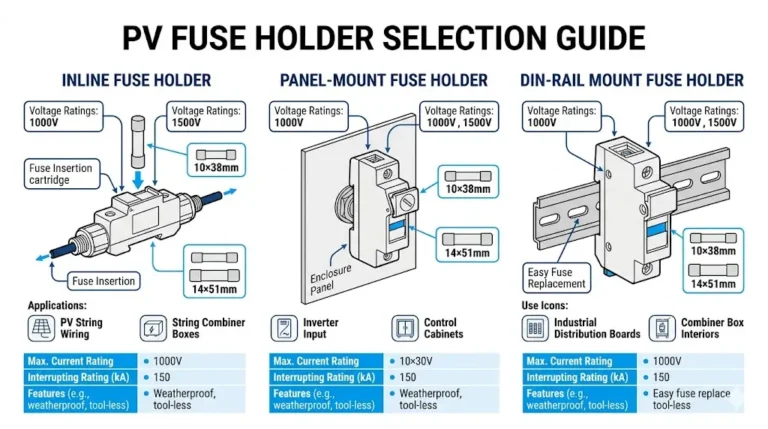
As chaves seccionadoras solares vêm em várias configurações, cada uma projetada para aplicações e arquiteturas de sistema específicas. Para selecionar o tipo correto de desconexão, é necessário compreender as diferenças fundamentais nos mecanismos operacionais, nas capacidades de interrupção e nas classificações de tensão. A escolha errada da desconexão compromete a segurança e a conformidade com as normas.
As chaves seccionadoras com fusível combinam a proteção contra sobrecorrente com a funcionalidade de desconexão em um único gabinete. Essas unidades contêm fusíveis com classificação CC que protegem os condutores e os equipamentos contra condições de sobrecorrente e, ao mesmo tempo, oferecem a capacidade de desconexão manual. As chaves seccionadoras com fusível simplificam as instalações, eliminando a necessidade de dispositivos separados de proteção contra sobrecorrente entre a matriz e o inversor.
O dimensionamento do fusível deve levar em conta a corrente máxima do circuito, normalmente 125% da corrente de curto-circuito para módulos cristalinos ou 156% para determinadas tecnologias de filme fino. Os fusíveis com classificação CC são projetados especificamente para interromper correntes CC, que são significativamente mais difíceis de extinguir do que as correntes CA. Nunca substitua fusíveis de CA em aplicações de CC - eles não têm a capacidade de interrupção e as classificações de tensão necessárias para a operação segura em CC.
As chaves seccionadoras sem fusível fornecem apenas isolamento, sem proteção contra sobrecorrente. Essas chaves seccionadoras são apropriadas quando dispositivos separados de proteção contra sobrecorrente são instalados a montante ou quando a chave seccionadora está localizada entre condutores protegidos. As chaves seccionadoras sem fusível são normalmente mais baratas e exigem menos manutenção do que as versões com fusível, pois não há fusíveis para inspecionar ou substituir.
⚠️ Importante: Os fusíveis CC e os fusíveis CA NÃO são intercambiáveis, apesar das classificações de corrente idênticas. Os fusíveis CC exigem corpos mais longos e materiais especiais de extinção de arco para interromper a corrente CC, que não tem um ponto de cruzamento zero natural. O uso de fusíveis de CA em circuitos de CC cria um sério risco de incêndio e explosão.
As chaves seccionadoras de CA são instaladas no lado da saída dos inversores, onde a energia foi convertida em corrente alternada. Essas chaves seccionadoras protegem os funcionários da concessionária e permitem o isolamento do inversor do painel de serviço elétrico. As chaves seccionadoras de CA usam chaves padrão com classificação NEMA projetadas para interrupção de corrente alternada em 120 V, 240 V ou 480 V, dependendo da configuração do sistema.
Os interruptores de desconexão CC lidam com a corrente contínua dos arranjos fotovoltaicos antes da inversão. As chaves CC exigem classificações de tensão significativamente mais altas - normalmente 600 V, 1.000 V ou 1.500 V CC - para lidar com a tensão máxima de circuito aberto da matriz. A interrupção de CC apresenta desafios exclusivos porque a corrente CC não tem o cruzamento zero natural da CA, o que dificulta a extinção do arco.
A construção física das chaves seccionadoras CC é muito diferente das chaves CA. As chaves CC incorporam espaços de contato mais longos, calhas de arco com bobinas magnéticas de descarga e materiais especializados de extinção de arco. Esses recursos permitem que a chave interrompa e extinga o arco CC sustentado que se forma quando os contatos se separam sob carga.
Muitos sistemas exigem desconexões de CA e CC para proporcionar isolamento completo. A desconexão CC isola a matriz do inversor, enquanto a desconexão CA isola o inversor da rede elétrica pública. Essa arquitetura de desconexão dupla garante que todas as fontes de energia potenciais possam ser isoladas de forma independente para máxima segurança.
As chaves seccionadoras de corte de carga podem interromper a corrente com segurança enquanto o circuito estiver energizado em condições normais de operação. Essas chaves contêm mecanismos de extinção de arco - calhas de arco, bobinas magnéticas de sopro e materiais de contato especializados - que lhes permitem interromper o circuito sem sustentar arcos perigosos. As chaves seccionadoras são classificadas para correntes de interrupção específicas que devem ser iguais ou superiores à corrente máxima do circuito.
As chaves seccionadoras sem carga (também chamadas de chaves isoladoras) só podem ser abertas quando a corrente do circuito é zero ou quase zero. A abertura de uma chave seccionadora sem carga sob carga cria um arco sustentado que pode soldar os contatos, danificar a chave e criar sérios riscos de incêndio. As chaves seccionadoras sem carga são apropriadas somente para circuitos que podem ser desenergizados por outros meios antes de operar a chave seccionadora.
Quando são usados interruptores que não interrompem a carga, o NEC exige uma etiqueta de advertência permanente informando “NÃO ABRIR SOB CARGA” ou linguagem semelhante. A etiqueta deve estar claramente visível para qualquer pessoa que esteja operando o interruptor. Essa advertência é fundamental porque os interruptores sem carga são normalmente indistinguíveis dos interruptores com carga apenas pela aparência.
🎯 Dica profissional: Sempre verifique a classificação de interrupção de carga na placa de identificação do seccionador antes de selecionar uma chave. Um seccionador classificado apenas como “isolador” ou “interruptor-seccionador” sem uma classificação específica de corrente de interrupção é um dispositivo que não é de corte de carga. Para máxima segurança e flexibilidade operacional, as chaves seccionadoras são a escolha preferida para a maioria das aplicações fotovoltaicas.
As chaves seccionadoras fechadas abrigam todas as peças que transportam corrente em um gabinete à prova de intempéries ou resistente a intempéries com classificação NEMA 3R, NEMA 4 ou NEMA 4X. Esses gabinetes protegem o mecanismo da chave contra chuva, neve, gelo e atmosferas corrosivas, evitando o contato acidental com peças energizadas. As seccionadoras fechadas são obrigatórias para instalações externas e para a maioria das aplicações comerciais.
O gabinete deve ser dimensionado para acomodar não apenas o switch, mas também o espaço de trabalho adequado para as conexões e quaisquer fusíveis ou dispositivos de sobrecorrente necessários. Os gabinetes NEMA 3R oferecem proteção básica contra intempéries com gerenciamento de condensação externa. Os gabinetes NEMA 4 e 4X oferecem proteção superior contra a entrada de água e a corrosão, sendo que o 4X utiliza aço inoxidável ou materiais não metálicos para ambientes adversos.
Os seccionadores de chave aberta são montados em painéis ou trilhos sem gabinetes integrados, dependendo de gabinetes ou armários de equipamentos separados para proteção. Essas chaves são apropriadas para instalações internas em caixas combinadoras fotovoltaicas, gabinetes de inversores ou salas elétricas. Os interruptores abertos normalmente oferecem vantagens de custo quando instalados em gabinetes protegidos existentes.

A especificação adequada da chave seccionadora requer a compreensão das características elétricas que determinam a operação segura. As classificações de tensão, a capacidade de corrente, as classificações de interrupção e os recursos de proteção adicionais devem ser cuidadosamente combinados com os requisitos do sistema. As desconexões mal especificadas criam riscos imediatos à segurança e violações de códigos.
As classificações de tensão CC devem ser iguais ou superiores à tensão máxima de circuito aberto (Voc) do conjunto fotovoltaico em todas as condições. A norma NEC 690.7 exige cálculos de tensão com base na menor temperatura ambiente esperada, o que aumenta a Voc significativamente acima dos valores nominais de 25°C. O fator de correção de tensão da Tabela 690.7(A) normalmente aumenta a Voc calculada em 12-25%, dependendo do clima local.
As classificações padrão de tensão de desconexão CC incluem 600 V CC, 1000 V CC e 1500 V CC. Uma desconexão com classificação de 600 V CC é adequada para sistemas residenciais com strings em série que não excedam aproximadamente 14 módulos (dependendo das especificações do módulo). Os sistemas comerciais com cadeias de caracteres mais longas exigem desconexões de 1000 V CC. As instalações em escala de serviços públicos usam cada vez mais arquiteturas de sistema de 1500 V CC que exigem desconexões com classificação adequada.
A classificação de tensão deve levar em conta toda a tensão da string, não as tensões de módulos individuais. Um erro comum é selecionar uma desconexão de 600 V para um sistema com 20 módulos de 60 células conectados em série, cada um classificado em 40 V Voc. A string Voc é de 800 V antes da correção de temperatura, podendo exceder 900 V após a correção - muito além da classificação da desconexão.
Nunca use uma chave classificada apenas para tensão CA em aplicações CC, mesmo que a classificação de tensão CA exceda a tensão do sistema CC. Uma chave classificada como 600V CA não pode interromper com segurança 400V CC porque as classificações de tensão não são diretamente comparáveis entre CA e CC. Sempre verifique a classificação de tensão CC especificamente marcada na placa de identificação da chave seccionadora.
As chaves de desconexão devem ser classificadas para corrente contínua igual ou superior a 125% da corrente máxima do circuito. Para circuitos de fonte fotovoltaica, a NEC 690.8 define a corrente máxima do circuito como a soma das correntes de curto-circuito classificadas em módulos paralelos multiplicada por 125%. Esse fator de segurança duplo leva em conta as condições de irradiância elevada e garante que a desconexão opere dentro de seus limites térmicos.
As classificações de corrente de desconexão disponíveis normalmente variam de 30A a 400A para aplicações residenciais e comerciais leves, com classificações maiores disponíveis para sistemas em escala de serviços públicos. A classificação de corrente contínua determina o tamanho dos barramentos, das superfícies de contato e dos terminais - todos os quais geram calor sob carga. Operar um seccionador além de sua classificação contínua causa aquecimento excessivo, levando à degradação do contato e à possível falha.
A classificação de corrente deve considerar não apenas a saída da matriz, mas também todas as fontes conectadas em paralelo que passam pela desconexão. Os sistemas com vários inversores ou combinadores de string paralelos exigem uma soma cuidadosa da corrente para garantir que a classificação da desconexão não seja excedida. Os dispositivos de proteção contra falha de aterramento e os interruptores de circuito de falha de arco adicionam uma carga mínima de corrente, mas devem ser considerados nos cálculos de corrente total.
💡 Principais percepções: O fator de dimensionamento do 125% na NEC 690.8 é aplicado à corrente de curto-circuito, NÃO à corrente de ponto de potência máxima. Muitos instaladores usam incorretamente os valores de Imp para dimensionar a desconexão, resultando em desconexões subdimensionadas. Sempre comece com Isc, multiplique por 125% e, em seguida, aplique quaisquer fatores adicionais de conexão paralela.
A capacidade de interrupção, medida em amperes de capacidade de interrupção (AIC), representa a corrente de falta máxima que o seccionador pode interromper com segurança sem falha catastrófica. Essa classificação deve ser igual ou superior à corrente de curto-circuito disponível no local da desconexão. Os seccionadores com classificação insuficiente podem explodir ao tentar interromper correntes de falta além de sua capacidade.
O cálculo da corrente de falha disponível para sistemas fotovoltaicos é diferente das instalações elétricas tradicionais. A corrente de falha de um conjunto fotovoltaico é limitada pelas próprias células fotovoltaicas, normalmente de 1,25 a 1,5 vezes a corrente de curto-circuito, independentemente da impedância do circuito. No entanto, ao calcular a corrente de falta em desconexões CA, é preciso considerar tanto a contribuição solar quanto a corrente de falta disponível da rede elétrica pública.
As seccionadoras com fusível dependem dos fusíveis para fornecer proteção contra curto-circuito, de modo que o próprio mecanismo da chave pode ter classificações de interrupção mais baixas. A combinação de chave e fusível deve fornecer, em conjunto, a capacidade de interrupção adequada. As chaves seccionadoras sem fusível devem ter capacidades de interrupção suficientes para lidar com toda a corrente de falta disponível sem depender de dispositivos de proteção a montante.
Para sistemas residenciais, as desconexões com classificações de 10.000 AIC normalmente são suficientes para aplicações de CC devido à natureza de limitação de corrente dos painéis fotovoltaicos. As desconexões CA podem exigir classificações de 22.000 AIC ou mais, dependendo da capacidade de serviço da concessionária. Sempre verifique as correntes de falha disponíveis por meio de cálculos ou dados da concessionária antes de selecionar as classificações de interrupção da desconexão.
Os sistemas fotovoltaicos modernos exigem a proteção do interruptor de circuito de falha de arco (AFCI) de acordo com a NEC 690.11 para detectar e interromper falhas de arco perigosas em circuitos CC. Algumas chaves seccionadoras incorporam a funcionalidade AFCI integral, combinando a proteção de desconexão e de falha de arco em um único dispositivo. Esses dispositivos combinados simplificam as instalações e reduzem os custos do equipamento, mantendo a conformidade total com o código.
As desconexões autônomas funcionam em conjunto com dispositivos AFCI localizados em inversores ou gabinetes combinadores separados. A desconexão não deve interferir na operação do AFCI - o que é particularmente importante para a detecção de falhas de arco em série, que monitora assinaturas de alta frequência no circuito CC. As chaves com baixa qualidade de contato ou resistência excessiva podem gerar disparos falsos de AFCI ou mascarar falhas de arco reais.
Os sistemas equipados com AFCI exigem rotulagem adicional por NEC 690.11(E), alertando que as falhas de arco podem não ser detectadas imediatamente na posição aberta. Esse aviso aborda o cenário em que uma falha de arco se desenvolve enquanto a chave seccionadora está aberta, criando um risco potencial quando a chave é fechada novamente. A rotulagem adequada garante que os funcionários da manutenção entendam as limitações da proteção contra falhas de arco.

A localização da desconexão determina a acessibilidade, a segurança e a conformidade com o código. O NEC estabelece requisitos específicos para o local onde as desconexões devem ser instaladas em relação ao equipamento, às estruturas do edifício e às rotas de acesso do pessoal. O posicionamento inadequado da desconexão está entre as violações de código mais comuns encontradas durante as inspeções.
O ponto de interconexão da concessionária exige uma desconexão CA acessível que permita aos funcionários da concessionária isolar o sistema solar da rede. O NEC 705.12 rege as conexões do lado da alimentação, enquanto o 705.20 abrange as conexões do lado da carga por meio do painel de serviço. Ambas as configurações exigem um meio de desconexão acessível ao pessoal da concessionária sem entrar no prédio.
As desconexões de interconexão da concessionária devem ser marcadas permanentemente com uma etiqueta que as identifique como desconexões do sistema fotovoltaico e indique a corrente e a tensão de saída nominal. A etiqueta deve ser refletiva, permanente e de durabilidade suficiente para resistir às condições ambientais. Muitas jurisdições exigem uma linguagem de etiqueta específica - verifique os requisitos locais antes da instalação.
A desconexão deve ser agrupada ou localizada no mesmo local que os meios de desconexão de serviço. Quando o agrupamento físico não for possível, uma placa ou diretório permanente deve ser instalado no local de desconexão do serviço, indicando a localização de todas as desconexões do sistema fotovoltaico. Esse requisito de diretório garante que os socorristas possam localizar rapidamente todos os pontos de desconexão.
“Facilmente acessível” é definido no Artigo 100 do NEC como capaz de ser alcançado rapidamente sem a necessidade de escalar ou remover obstáculos ou o uso de escadas portáteis. Essa definição tem implicações específicas para alturas de montagem de desconexões, localizações de salas trancadas e posicionamentos em telhados. Uma desconexão montada a 8 pés de altura em uma parede não é prontamente acessível.
A altura prática de montagem para desconexões prontamente acessíveis é entre 4,5 e 6,5 pés acima do piso acabado ou do nível do solo. Essa faixa de altura permite que operadores adultos alcancem a alavanca de operação sem escadas, mantendo a desconexão acima de possíveis níveis de inundação e longe do alcance de crianças.
As desconexões instaladas dentro de salas elétricas trancadas não atendem ao requisito de fácil acesso, a menos que a sala seja normalmente destrancada durante a ocupação do prédio ou que a desconexão também seja acessível do lado de fora da sala. Salas de servidores, salas mecânicas e gabinetes no telhado que exigem chaves ou códigos de segurança impedem o acesso imediato e violam a norma NEC 690.13.
⚠️ Importante: “Ao alcance” não é igual a “prontamente acessível” nos termos da NEC. Uma chave seccionadora montada a 2,5 metros de altura pode ser alcançada por uma pessoa alta ou por alguém que use um pequeno degrau, mas não atende ao requisito de fácil acesso porque exige um esforço além de simplesmente subir e operar a chave.
“À vista” é definido como visível e a uma distância não superior a 50 pés. Esse requisito garante que os trabalhadores de manutenção possam ver a desconexão enquanto trabalham no equipamento que ela controla, confirmando que ela permanece na posição aberta. A distância de 50 pés é medida ao longo do caminho que alguém percorreria, não como uma linha reta através de paredes ou obstáculos.
As desconexões de equipamentos de acordo com a NEC 690.15 devem estar à vista do equipamento ou poder ser travadas na posição aberta. Quando o requisito de estar à vista não puder ser atendido devido ao layout do prédio ou à localização do equipamento, a desconexão deve acomodar uma trava que permaneça no lugar, independentemente de a trava real ser instalada ou removida.
O requisito de estar à vista torna-se desafiador em grandes instalações comerciais, onde os inversores podem estar localizados em salas mecânicas, enquanto as desconexões são necessárias em locais externos acessíveis à concessionária. Nesses casos, a desconexão externa atende aos requisitos de acesso à rede elétrica, enquanto uma desconexão separada do equipamento à vista do inversor atende à NEC 690.15.
🎯 Dica profissional: Use o teste “vire-se e aponte” para verificar a conformidade à vista. Fique em pé ao lado do equipamento que está sendo reparado, vire-se e aponte para a desconexão. Se você puder vê-la sem se mover de sua posição e se ela estiver a menos de 15 metros de distância, ela atende ao requisito de visibilidade.
As instalações externas de desconexão exigem gabinetes resistentes a intempéries com classificação mínima NEMA 3R para proteção contra chuva. Os ambientes costeiros e industriais exigem gabinetes NEMA 4X com construção resistente à corrosão - normalmente, aço inoxidável ou poliéster reforçado com fibra de vidro. A classificação do gabinete deve corresponder às condições climáticas mais severas previstas para os 25 anos de vida útil do equipamento.
Os seccionadores externos devem ser montados em paredes ou estruturas que ofereçam proteção contra a exposição direta ao sol, sempre que possível. A exposição prolongada à luz solar direta aquece os gabinetes significativamente acima da temperatura ambiente, podendo exceder a classificação de temperatura do seccionador. Os gabinetes de metal de cor escura expostos diretamente ao sol podem atingir 160°F em dias de verão, degradando os componentes internos.
As instalações internas permitem gabinetes NEMA 1 de baixo custo, pois não é necessária proteção contra intempéries. No entanto, as desconexões internas ainda devem estar prontamente acessíveis, não localizadas em armários de armazenamento, sótãos com escadas suspensas ou atrás de equipamentos que bloqueiem o acesso. Os locais internos devem fornecer espaços de trabalho adequados de acordo com a NEC 110.26 - mínimo de 36 polegadas de largura por 30 polegadas de profundidade na frente da desconexão.


A instalação profissional de desconectores requer atenção aos métodos de montagem, conexões elétricas, aterramento e rotulagem. Cada etapa deve ser executada de acordo com as especificações do fabricante e os requisitos da NEC. Atalhos ou técnicas inadequadas comprometem a segurança e criam violações de códigos que atrasam a conclusão do projeto.
Monte os compartimentos de desconexão de modo que o centro da alça de operação fique entre 4,5 e 6,5 pés acima do piso acabado ou do nível do solo. Essa faixa de altura proporciona pronta acessibilidade para operadores adultos, mantendo o espaço livre acima de possíveis níveis de inundação e paisagismo. Use um nível a laser para estabelecer alturas de montagem consistentes ao instalar várias desconexões.
Prenda os gabinetes a membros estruturais capazes de suportar o peso da desconexão mais as forças aplicadas durante a operação. As âncoras de parede oca e os parafusos de drywall são insuficientes para instalações de desconexão - use parafusos de atraso em vigas para construções de madeira ou âncoras de concreto apropriadas para alvenaria. A montagem deve impedir o movimento do compartimento quando a alavanca do interruptor for operada com força.
Mantenha as folgas mínimas de trabalho NEC 110.26: 36 polegadas de largura, 30 polegadas de profundidade e 6,5 pés de altura na frente da desconexão. O espaço de trabalho deve estar livre de armazenamento, equipamentos mecânicos ou outras obstruções. A medida da profundidade começa na face do compartimento e se estende perpendicularmente, independentemente da direção de giro da porta.
A montagem em ambientes externos requer a consideração da exposição ao sol, da direção predominante do vento e do acúmulo de neve. Monte os gabinetes em paredes voltadas para o norte ou leste no Hemisfério Norte para minimizar a exposição ao sol. A montagem no nível do solo em regiões com muita neve deixa as desconexões inacessíveis durante os meses de inverno.
A norma NEC 690.13(B) exige uma etiqueta permanente no meio de desconexão indicando que ele controla o sistema fotovoltaico. A etiqueta deve ser refletiva e identificar a função, a tensão e a corrente nominal da desconexão. Etiquetas de desconexão solar pré-impressas estão disponíveis em fornecedores elétricos ou você pode usar um fabricante de etiquetas industriais com materiais resistentes a UV.
Etiquetas adicionais devem avisar que as seccionadoras CC podem permanecer energizadas nos lados da linha e da carga quando abertas. O texto da etiqueta de advertência normalmente diz: “AVISO: PERIGO DE CHOQUE ELÉTRICO. NÃO TOQUE NOS TERMINAIS. OS TERMINAIS DOS LADOS DA LINHA E DA CARGA PODEM ESTAR ENERGIZADOS NA POSIÇÃO ABERTA”. Essa etiqueta deve estar visível ao acessar o interior da desconexão.
Para chaves seccionadoras que não sejam de corte de carga, uma etiqueta destacada deve informar “NÃO ABRIR SOB CARGA” ou linguagem equivalente. Esse aviso evita que os operadores tentem interromper a corrente com uma chave não classificada para operação de corte de carga. Coloque a etiqueta diretamente sobre a alavanca de operação ou imediatamente adjacente a ela, em um local onde não possa passar despercebida.
Crie uma etiqueta de diretório do sistema listando todos os locais de desconexão quando várias desconexões atenderem ao mesmo sistema fotovoltaico. Instale esse diretório no local de desconexão de serviço onde os socorristas normalmente iniciam os procedimentos de desligamento de emergência. Inclua descrições específicas do local, como “DC Disconnect: Parede externa leste perto do inversor” em vez de referências vagas.
💡 Principais percepções: A etiquetagem não é uma decoração opcional - é um requisito do código que pode significar a diferença entre uma manutenção segura e uma eletrocussão. Os inspetores reprovarão instalações com etiquetas ausentes, inadequadas ou deterioradas. Use materiais de etiqueta de nível industrial projetados para uma vida útil de 25 anos em ambientes externos.
Conecte todos os gabinetes de desconexão metálicos ao sistema de aterramento do equipamento usando condutores dimensionados de acordo com a tabela 250.122 da NEC. O condutor de aterramento deve ser conectado ao parafuso ou terminal de aterramento verde fornecido no gabinete, nunca aos barramentos neutros ou aos parafusos de montagem do gabinete. Para sistemas com várias desconexões, cada compartimento deve ser aterrado individualmente.
Os sistemas fotovoltaicos exigem o aterramento do equipamento e do sistema de acordo com a norma NEC 690.41-690.47. O aterramento do equipamento protege contra falhas elétricas, fornecendo um caminho de baixa impedância para a corrente de falha. O aterramento do sistema (negativo DC ou aterramento da ponta central) fornece uma referência à terra e limita a sobretensão causada por raios ou falhas de aterramento.
O condutor do eletrodo de aterramento para o sistema de aterramento CC deve ser conectado o mais próximo possível da fonte CC - normalmente na matriz ou no compartimento de desconexão. Quando o gabinete de desconexão de CC contiver o ponto de conexão de aterramento do sistema, certifique-se de que o condutor do eletrodo seja dimensionado de acordo com a norma NEC 250.166 e seja contínuo, sem emendas.
As buchas de ligação são necessárias quando o conduíte metálico entra no compartimento e contém condutores de aterramento. A bucha fornece um caminho de ligação de baixa impedância entre o conduíte e o compartimento, garantindo caminhos eficazes para a corrente de falha de aterramento. As buchas de plástico padrão não fornecem ligação e criam violações de código quando usadas com sistemas de conduítes metálicos.
Aperte todas as conexões de terminais com os valores de torque especificados na etiqueta de desconexão ou nas instruções do fabricante. Conexões com torque insuficiente criam alta resistência que gera calor, levando à falha do terminal e a um possível incêndio. As conexões com torque excessivo podem danificar as roscas ou rachar os fios condutores, aumentando também a resistência.
Use uma chave de fenda de torque calibrada ou uma chave de torque - nunca adivinhe o torque adequado. As especificações de torque do terminal normalmente variam de 25 a 35 lb-in para terminais menores (#14-#10 AWG) a 150-250 lb-in para terminais grandes (350-500 kcmil). Registre os valores de torque e a identificação do terminal durante a instalação para referência futura de manutenção.
Aplique um composto antioxidante nos condutores de alumínio antes de inseri-los nos terminais. O composto evita a formação de óxido que aumenta a resistência da conexão. Não aplique antioxidante em condutores de cobre, a menos que seja especificamente recomendado pelo fabricante. Limpe o excesso de composto ao redor dos terminais para evitar a contaminação das superfícies isolantes.
Descarne os condutores no comprimento exato indicado pelo medidor de descarne marcado no terminal. O excesso de condutores expostos além do terminal cria riscos de choque; a inserção insuficiente não consegue engatar toda a área de fixação. Utilize um decapador de fios de qualidade que remova o isolamento sem cortar os fios do condutor.
| Tipo de desconexão | Classificação de tensão | Aplicativo principal | Principais vantagens | Referência NEC |
|---|---|---|---|---|
| Desconexão CC com fusível | 600V-1500V CC | Saída de matriz CC, combinação de sobrecorrente + isolamento | Combina proteção contra sobrecorrente com desconexão; o gabinete único reduz o custo de instalação; indicação visível do status do fusível | 690.13, 690.14, 690.16 |
| Desconexão CC sem fusível | 600V-1500V CC | Isolamento de CC quando houver proteção separada contra sobrecorrente | Custo mais baixo do que a versão com fusível; sem manutenção de substituição do fusível; adequado para circuitos protegidos | 690.13, 690.14 |
| Desconexão de CA | 120V-480V CA | Saída CA do inversor, ponto de interconexão da concessionária | Capacidade de interrupção de CA padrão; acessível ao funcionário da concessionária; pode ser integrado ao painel de serviço | 690.13, 705.12, 705.20 |
| Chave seccionadora de carga | Varia de acordo com o modelo | Qualquer local que exija interrupção sob carga | Pode abrir com corrente total; sem restrições operacionais; máxima flexibilidade para manutenção | 690.13, 690.17 |
| Isolador (sem interrupção de carga) | Varia de acordo com o modelo | Somente isolamento, depois que o circuito for desenergizado por outros meios | Custo mais baixo do que o do quebra-carga; adequado para desconexões raramente operadas; design de lâmina aberta visível | 690.13 (com etiqueta de advertência) |

Até mesmo eletricistas experientes cometem erros de instalação de desconexão que comprometem a segurança e a conformidade com os códigos. Compreender esses erros comuns ajuda a evitar correções dispendiosas, inspeções fracassadas e possíveis incidentes de segurança. Cada erro representa uma violação do mundo real frequentemente encontrada durante as inspeções.
As chaves seccionadoras sem interrupção de carga (isoladores) são frequentemente instaladas sem a etiqueta de advertência “NÃO ABRIR SOB CARGA”. Essas chaves não possuem os mecanismos de extinção de arco necessários para interromper com segurança a corrente sob carga. Abri-las enquanto estão energizadas cria arcos contínuos que podem soldar os contatos, destruir a chave e causar incêndios ou explosões.
O perigo é ampliado em circuitos CC, nos quais o arco sustentado pode atravessar lacunas de contato a distâncias surpreendentes. Um arco de 400 V CC pode se sustentar em espaços superiores a 3/4 de polegada, saltando facilmente de contatos de interruptores abertos para superfícies condutoras próximas. O calor intenso dos arcos contínuos derrete os condutores de cobre e inflama os materiais ao redor em segundos.
As chaves seccionadoras sem carga são apropriadas somente quando o circuito pode ser desenergizado por outros meios antes da operação da chave seccionadora. Por exemplo, um isolador a jusante de uma chave seccionadora de corte de carga ou de um disjuntor fornece isolamento visível depois que o dispositivo a montante interrompe a corrente. A etiqueta de advertência é obrigatória - não presuma que os operadores entenderão a limitação.
Evite totalmente o problema especificando seccionadores de corte de carga para todos os locais em que a chave possa ser operada sob carga. A diferença de custo é mínima em comparação com os benefícios de segurança e a flexibilidade operacional. Reserve os seccionadores sem quebra-carga para aplicações em que seja necessário um isolamento visível de lacuna aberta após a interrupção da corrente por outros meios.
A seleção de um seccionador CC de 600 V para um sistema com Voc corrigido superior a 600 V está entre os erros de especificação mais perigosos. Quando a tensão do sistema excede a classificação do seccionador, as folgas de isolamento e as lacunas de contato são insuficientes para evitar a queda de tensão. O arco interno pode ocorrer mesmo com a chave na posição aberta, criando riscos de incêndio e anulando a função de isolamento.
O erro geralmente ocorre quando os instaladores usam o módulo Voc a 25°C sem aplicar o fator de correção de temperatura da Tabela 690.7(A) do NEC. Uma cadeia de 16 módulos com Voc de 45V a 25°C produz 720V a 25°C. A aplicação do fator de correção de temperatura de 1,12 para climas frios aumenta a tensão para 806 V - bem além da classificação de uma desconexão de 600 V.
Outro erro comum é confundir as classificações de tensão CA e CC. Um seccionador marcado como “600V CA” não tem uma classificação de 600V CC, a menos que esteja especificamente marcado. As classificações de tensão CA não podem ser comparadas diretamente com as classificações CC porque as formas de onda de tensão e as características de interrupção são fundamentalmente diferentes. Sempre verifique a classificação de tensão CC especificamente marcada na placa de identificação.
Calcule a tensão máxima do sistema usando a temperatura mais fria esperada para a sua localização e, em seguida, selecione uma desconexão classificada com pelo menos 125% dessa tensão para obter uma margem de segurança. Para sistemas residenciais, as desconexões de 1000 V CC estão se tornando cada vez mais padrão à medida que as melhorias de eficiência do módulo aumentam as tensões de string. Os sistemas comerciais devem usar como padrão as classificações de 1000V ou 1500V CC, dependendo da arquitetura do sistema.
A montagem de chaves seccionadoras acima de 1,5 m não atende ao requisito de “prontamente acessível”, mesmo que a alavanca de operação possa ser alcançada por pessoas altas ou com um pequeno degrau. A definição do NEC é clara: prontamente acessível significa alcançável sem a necessidade de subir em obstáculos ou usar escadas portáteis. Uma altura de montagem de 8 pés que exija uma escada de mão não atende categoricamente a esse requisito.
A violação é particularmente comum em instalações comerciais em que os eletricistas montam as chaves seccionadoras no alto das paredes para evitar adulteração ou danos causados por empilhadeiras. Embora essas preocupações sejam válidas, a solução não é montar interruptores fora do alcance - é usar seccionadores trancados com a disposição de travamento que satisfaz os requisitos de segurança e acessibilidade.
As desconexões em telhados apresentam desafios especiais para o requisito de fácil acesso. Uma desconexão em um telhado comercial plano acessado por uma escada permanentemente anexada pode atender à definição de prontamente acessível, mas um telhado residencial que requer uma escada extensível não. Locais no nível do solo ou em paredes externas são preferíveis para a acessibilidade da desconexão.
A solução prática é estabelecer uma altura de montagem padrão de 1,5 m até o centro da alça para todas as desconexões. Essa altura funciona para quase todos os operadores, mantém o espaço livre acima da maioria das obstruções no nível do solo e atende aos requisitos de fácil acesso. Use modelos de marcação para garantir alturas consistentes em várias instalações de desconexão.
Etiquetas ausentes ou inadequadas estão entre as falhas de inspeção mais comuns em instalações solares. A NEC exige várias etiquetas específicas nos locais de desconexão: identificação do sistema fotovoltaico, classificações de tensão e corrente, avisos sobre terminais energizados, limitações de corte de carga (quando aplicável) e diretórios mostrando outros locais de desconexão. Etiquetas escritas à mão em fita não são aceitáveis.
A durabilidade das etiquetas é fundamental - os sistemas solares operam por mais de 25 anos em ambientes externos adversos. As etiquetas de papel, os marcadores permanentes escritos nos gabinetes e as etiquetas não refletivas se deterioram em poucos meses, deixando as desconexões sem identificação quando a manutenção é necessária anos depois. Use etiquetas refletivas pré-impressas ou fabricantes de etiquetas industriais com materiais resistentes a raios ultravioleta classificados para serviço externo.
O posicionamento da etiqueta é tão importante quanto o conteúdo. As etiquetas de identificação devem estar visíveis na posição de operação sem abrir o compartimento. As etiquetas de advertência sobre terminais energizados devem estar visíveis quando o compartimento for aberto para manutenção. As etiquetas de aviso de quebra de carga devem estar na alça de operação, onde os operadores as vejam antes de operar a chave.
As etiquetas do diretório do sistema que listam todos os locais de desconexão são frequentemente omitidas por completo. Quando um sistema fotovoltaico tem várias desconexões - CC na matriz, CC no inversor, CA no inversor, CA no painel de serviço - um diretório deve ser colocado no local da desconexão de serviço mostrando todos os tipos e locais de desconexão. Esse diretório é essencial para os socorristas durante emergências.
A manutenção regular da desconexão garante uma operação confiável quando o isolamento é necessário para a manutenção do sistema ou resposta a emergências. As desconexões negligenciadas podem não abrir, não interromper a corrente adequadamente ou desenvolver conexões de alta resistência que geram calor perigoso. O estabelecimento de cronogramas de manutenção evita falhas inesperadas durante operações críticas.
Inspecione todas as chaves seccionadoras anualmente quanto a sinais de superaquecimento, corrosão, desgaste dos contatos e danos mecânicos. A inspeção visual começa com o exterior do gabinete - procure por ferrugem ou corrosão em gabinetes de metal, rachaduras ou danos causados por raios UV em gabinetes de plástico e evidências de infiltração de água através de juntas ou entradas de conduíte.
Abra o gabinete e inspecione os componentes internos quanto a descoloração, isolamento derretido ou odores de queimado que indiquem superaquecimento. Verifique o aperto de todos os terminais usando as especificações de torque originais - as conexões podem se soltar com o tempo devido ao ciclo térmico. Terminais descoloridos, condutores enegrecidos ou isolamento derretido indicam problemas de conexão que exigem atenção imediata.
Examine os fusíveis em seccionadores com fusível quanto a sinais de aquecimento ou corrosão nos contatos da ponteira. Substitua os fusíveis que apresentarem sinais de danos ou superaquecimento, mesmo que não tenham se aberto. Verifique se as classificações dos fusíveis correspondem ao projeto do sistema - a substituição de classificações incorretas de fusíveis compromete a proteção contra sobrecorrente e cria riscos de incêndio.
Verifique se todos os rótulos necessários estão presentes, legíveis e bem fixados. Substitua imediatamente as etiquetas deterioradas ou ausentes. Verifique se as etiquetas de advertência sobre terminais energizados e limitações de corte de carga permanecem visíveis e legíveis. Atualize as etiquetas de diretório se os locais ou as configurações de desconexão tiverem sido alterados.
Meça anualmente a resistência de contato entre os contatos da chave seccionadora usando um ohmímetro digital de baixa resistência. As medições adequadas de baixa resistência exigem uma conexão kelvin de quatro fios que elimina a resistência do cabo de teste. A resistência de contato deve ser inferior a 1 miliohm para que as chaves seccionadoras funcionem adequadamente - uma resistência mais alta indica contatos degradados.
Teste com a chave fechada e sem fluxo de corrente. Desconecte todos os condutores do lado da carga da chave para isolar a desconexão para teste. Conecte os cabos de teste diretamente aos terminais de linha e de carga de cada polo. Registre os valores de resistência e compare-os com as especificações do fabricante e com os resultados de testes anteriores.
O aumento da resistência de contato ao longo do tempo indica degradação progressiva do contato. Uma desconexão que apresente 0,5 miliohms em um ano e 2,0 miliohms no ano seguinte está se deteriorando e deve ser substituída antes da falha. A degradação do contato se acelera quando começa - o aumento da resistência gera mais calor, o que acelera a oxidação, aumentando ainda mais a resistência em um ciclo destrutivo.
Limpe os contatos que apresentem oxidação ou contaminação menores de acordo com os procedimentos do fabricante. Muitos seccionadores CC usam contatos revestidos de prata que não devem ser limados ou desgastados - a limpeza remove o revestimento de prata e acelera a degradação futura. Substitua os contatos ou a chave inteira quando a resistência exceder os limites aceitáveis.
Exercite as chaves seccionadoras trimestralmente, abrindo-as e fechando-as várias vezes sem que haja fluxo de corrente. A operação mecânica evita que as superfícies de contato se soldem devido à oxidação e mantém os pontos de articulação e os mecanismos operacionais livres. A chave deve operar suavemente com força consistente em todo o percurso.
As sensações de emperramento, resistência incomum ou moagem indicam problemas mecânicos que exigem investigação. Os pinos do pivô podem precisar de lubrificação com um lubrificante apropriado de grau elétrico. Nunca use lubrificantes à base de petróleo que atraem poeira ou podem contaminar os contatos. Os mecanismos com mola devem retornar as alças aos seus pontos de retenção de forma positiva, sem força adicional.
Teste anualmente a operação de chaveamento sob carga (se for seguro fazê-lo) para verificar se o seccionador pode realmente interromper a corrente do circuito. Esse teste é particularmente importante para seccionadores de corte de carga que podem ser solicitados a interromper a corrente durante desligamentos de emergência. Coordene o teste de carga com o tempo de inatividade do sistema para minimizar as perdas de geração.
Documente todas as atividades de manutenção, incluindo datas de inspeção, descobertas, medições de resistência e quaisquer ações corretivas tomadas. Mantenha um livro de registro para cada desconexão mostrando seu histórico completo de manutenção. Essa documentação comprova a devida diligência durante as inspeções e ajuda a identificar tendências de queda de desempenho antes que ocorram falhas.
Uma chave de desconexão solar é um dispositivo de comutação operado manualmente que isola os sistemas fotovoltaicos de todas as fontes de energia para manutenção segura e resposta a emergências. O artigo 690.13 da NEC exige meios de desconexão para todos os condutores em um sistema fotovoltaico porque os painéis solares geram tensão continuamente sempre que a luz incide sobre os painéis - eles não podem ser “desligados” como as fontes elétricas convencionais.
A desconexão fornece um isolamento visível de lacuna aberta que permite que os trabalhadores verifiquem o isolamento da energia antes de fazer a manutenção do equipamento. Os socorristas precisam de desconexões acessíveis para desenergizar os sistemas durante incêndios em estruturas, quando os painéis solares energizados representam riscos de eletrocussão. Sem as devidas desconexões que atendem aos requisitos da NEC, os sistemas falham na inspeção e não podem ser legalmente energizados.
Os sistemas solares exigem vários locais de desconexão: uma desconexão CC na saída do conjunto (NEC 690.14), uma desconexão do equipamento à vista do inversor (NEC 690.15) e uma desconexão CA no ponto de interconexão da rede elétrica (NEC 690.13 e 705.12/705.20). Cada desconexão deve ser facilmente acessível, o que normalmente significa que deve ser montada entre 4,5 e 6,5 pés de altura.
A desconexão da interconexão da concessionária deve ser acessível aos funcionários da concessionária sem entrar no edifício. As desconexões do conjunto de CC devem ser montadas no exterior do edifício mais próximo do ponto em que os condutores de CC entram no edifício, ou no interior, a menos de 3 metros da entrada. Todas as desconexões exigem espaço livre para trabalho, de acordo com a NEC 110.26, e rotulagem adequada identificando sua função.
As chaves seccionadoras CA lidam com a corrente alternada das saídas do inversor e usam mecanismos de interrupção padrão que dependem do cruzamento zero natural da CA para extinguir arcos. As chaves seccionadoras CC manipulam a corrente contínua das matrizes fotovoltaicas e exigem tecnologia especializada de extinção de arcos - lacunas de contato mais longas, bobinas magnéticas de descarga e calhas de arco - porque a corrente CC não tem cruzamento zero.
As chaves seccionadoras de CC exigem tensões nominais muito mais altas (600V-1500V CC) em comparação com as chaves seccionadoras de CA (normalmente 240V ou 480V CA) para lidar com tensões de circuito aberto de matriz. Nunca substitua uma chave com classificação de CA em aplicações de CC, mesmo que a classificação de tensão de CA pareça maior - os mecanismos de interrupção e os sistemas de isolamento são fundamentalmente incompatíveis com os circuitos de CC.
Um disjuntor devidamente classificado pode servir como meio de desconexão se atender aos requisitos do NEC 690.13: deve ser facilmente acessível, capaz de ser travado na posição aberta e classificado para a tensão e a corrente do circuito. No entanto, os disjuntores CA padrão NÃO são adequados para circuitos CC - são necessários disjuntores específicos para CC com tensão e classificações de interrupção apropriadas.
Muitos inversores incorporam disjuntores de CA integrais em sua saída que podem servir como desconexão de CA quando adequadamente classificados e acessíveis. O disjuntor deve ser classificado para a corrente de falha disponível e ser travável na posição aberta. Certifique-se de que qualquer disjuntor usado como desconexão tenha uma indicação visível da posição de contato - nem todos os disjuntores mostram externamente a verdadeira posição de contato.
Dimensione as chaves seccionadoras para corrente contínua igual ou superior a 125% da corrente máxima do circuito de acordo com a NEC 690.8. Calcule a corrente máxima do circuito como a soma das correntes de curto-circuito (Isc) classificadas em módulos paralelos multiplicada por 125%. Para classificações de tensão, calcule a tensão máxima de circuito aberto (Voc) na temperatura mais baixa esperada usando os fatores de correção da Tabela 690.7(A) da NEC e, em seguida, selecione uma desconexão classificada pelo menos igual a essa tensão.
Por exemplo, uma cadeia com 15 módulos classificados como 10A Isc e 40V Voc requer: Classificação de corrente = 10A × 1,25 × 1,25 = 15,6A no mínimo (selecione a desconexão de 20A ou 30A). Classificação de tensão a -10°F com fator de correção de 1,14 = 15 módulos × 40V × 1,14 = 684V (selecione a desconexão de 1000V CC, não 600V).
As chaves seccionadoras do tipo quebra-carga contêm mecanismos de extinção de arco que permitem a interrupção segura da corrente em condições de carga total sem a formação contínua de arco. Essas chaves podem ser abertas durante a operação normal do sistema, o que as torna adequadas para atividades de manutenção de rotina. As chaves seccionadoras têm classificações específicas de capacidade de interrupção de amperes (AIC) que indicam a corrente máxima que podem interromper com segurança.
Os seccionadores sem corte de carga (isoladores) fornecem apenas isolamento e não podem interromper com segurança a corrente de carga. Eles devem ser abertos somente depois que a corrente for interrompida por outros meios - uma chave seccionadora de corte de carga, um disjuntor ou o desligamento do inversor. A abertura de uma chave seccionadora sem carga sob carga cria arcos elétricos sustentados perigosos. Essas chaves exigem etiquetas de advertência informando “NÃO ABRIR SOB CARGA” e devem ser usadas somente quando a desenergização do circuito por outros meios for certa.
Realize inspeções anuais verificando sinais de superaquecimento, corrosão, condição da etiqueta e aperto do terminal. Meça a resistência de contato anualmente usando um ohmímetro de baixa resistência - as leituras devem estar abaixo de 1 miliohm para que os contatos funcionem adequadamente. Exercite a chave trimestralmente, abrindo e fechando-a várias vezes sem corrente para evitar a soldagem de contatos e manter a operação mecânica.
Teste a capacidade real de interrupção de corrente anualmente, se for possível com segurança, durante o tempo de inatividade programado. Para seccionadores com fusível, inspecione os fusíveis anualmente quanto a sinais de aquecimento ou corrosão nos contatos da ponteira. Documente todas as atividades de manutenção, medições e descobertas em um livro de registro de manutenção. Substitua qualquer seccionador que apresente resistência de contato acima de 2 miliohms, travamento mecânico ou sinais de superaquecimento interno.
As chaves de desconexão solar são dispositivos de segurança obrigatórios que permitem o isolamento seguro de sistemas fotovoltaicos para manutenção, solução de problemas e resposta a emergências. A seleção adequada requer a compreensão dos requisitos da NEC nos artigos 690.13, 690.14 e 690.15, que exigem locais específicos de desconexão, padrões de acessibilidade e especificações técnicas. A diferença entre as desconexões CA e CC, as configurações com e sem fusíveis e os interruptores com e sem quebra de carga determinam instalações seguras e em conformidade com o código.
As classificações corretas de tensão e corrente protegem contra os riscos exclusivos dos circuitos CC, nos quais arcos sustentados podem causar danos catastróficos ao equipamento e incêndios. As classificações de tensão CC devem acomodar a tensão de circuito aberto com correção de temperatura dos painéis fotovoltaicos, normalmente exigindo chaves com classificação de 1000V ou 1500V CC para módulos modernos de alta eficiência. As classificações de corrente devem ser de pelo menos 125% da corrente máxima do circuito com margens de segurança adicionais para a capacidade de interrupção.
O local de instalação determina a acessibilidade e a segurança - as desconexões devem estar prontamente acessíveis, à vista dos equipamentos controlados (ou com trava) e instaladas com folgas de trabalho adequadas. As alturas de montagem entre 4,5 e 6,5 pés satisfazem os requisitos de fácil acesso e, ao mesmo tempo, mantêm a segurança. A rotulagem abrangente que identifica a função de desconexão, as classificações de tensão/corrente e os avisos operacionais é obrigatória, não opcional.
Erros comuns de instalação, inclusive classificações incorretas de tensão, alturas excessivas de montagem, falta de etiquetas de advertência e interruptores sem carga sem advertências criam riscos imediatos à segurança e violações de códigos. Seguir os procedimentos adequados de instalação para montagem, aterramento, torque do terminal e etiquetagem garante uma operação confiável a longo prazo. A manutenção regular, incluindo inspeções anuais, testes de resistência de contato e exercícios operacionais, evita falhas de desconexão quando o isolamento é extremamente necessário.
Para obter orientações abrangentes sobre os componentes de proteção elétrica CC relacionados:
- Disjuntor CC - Compreender os disjuntores de classificação CC com capacidade de interrupção adequada para proteção contra sobrecorrente fotovoltaica
- Chave seccionadora CC - Explore soluções completas de desconexão CC, incluindo configurações com e sem fusível
- Caixa combinadora fotovoltaica - Saiba mais sobre os conjuntos de caixas combinadoras que integram desconexões, proteção contra sobrecorrente e monitoramento
- Caixa de distribuição à prova d'água - Descubra as soluções de gabinetes NEMA 4X para ambientes externos adversos que exigem proteção superior contra corrosão
Para instalações solares profissionais que exigem chaves seccionadoras em conformidade com o código, a seleção e a instalação adequadas dos componentes, seguindo os requisitos do Artigo 690 da NEC, garantem segurança, confiabilidade e inspeções bem-sucedidas. Investir em chaves seccionadoras de qualidade, com classificações de tensão apropriadas, capacidade de interrupção de carga e gabinetes duráveis e resistentes a intempéries, proporciona décadas de serviço sem manutenção, protegendo o pessoal e o equipamento.