住所
304ノース・カーディナル
セント・ドーチェスター・センター(マサチューセッツ州02124
勤務時間
月曜日~金曜日:午前7時~午後7時
週末午前10時~午後5時
住所
304ノース・カーディナル
セント・ドーチェスター・センター(マサチューセッツ州02124
勤務時間
月曜日~金曜日:午前7時~午後7時
週末午前10時~午後5時

12 volt DC circuit breakers are the backbone of electrical protection in automotive, marine, and recreational vehicle (RV) systems. Unlike household AC breakers, these specialized devices protect low-voltage DC circuits from overcurrent conditions in batteries, solar charging systems, inverters, and accessory circuits.
This comprehensive guide covers everything you need to know about selecting, sizing, installing, and troubleshooting 12V DC circuit breakers for mobile and off-grid applications.
12 volt systems operate at significantly different electrical characteristics compared to higher voltage DC systems:
- Lower voltage, higher current: A 1200W load at 12V draws 100A (versus 12A at 120V AC)
- Arc suppression challenges: DC arcs don’t naturally extinguish like AC
- Thermal management: High current flow generates significant heat
- Polarity considerations: DC systems require proper positive/negative connections
- Battery discharge characteristics: Voltage sag affects breaker performance
主な用途
– Automotive electrical systems (cars, trucks, motorcycles)
– Marine vessels (boats, yachts, sailboats)
– RVs and campers
– Off-grid solar battery systems
– Golf carts and electric vehicles
- 農業機械
– Emergency backup power systems
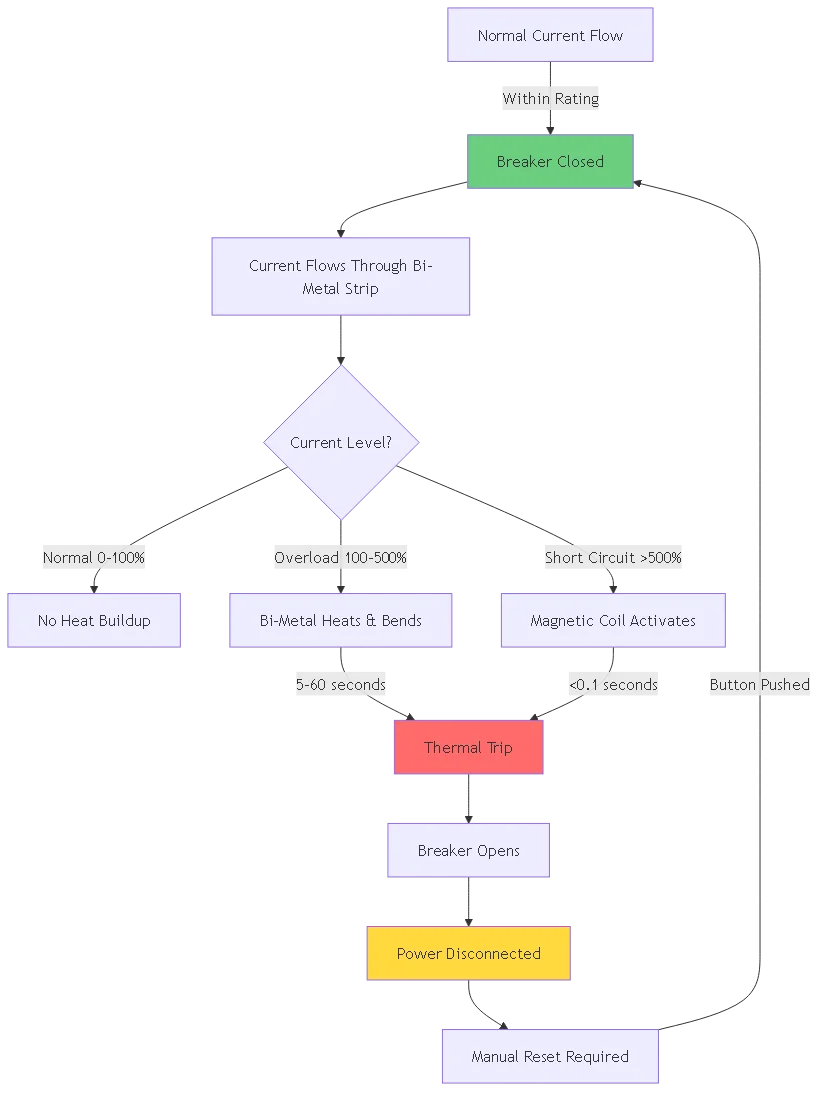
A 12 volt DC circuit breaker protects electrical circuits through two primary mechanisms:
1. Thermal Trip Mechanism
– Bi-metal strip heats up with current flow
– Excessive current causes strip to bend
– Mechanical linkage trips the breaker open
– Response time: 5-60 seconds depending on overload severity
2. Magnetic Trip Mechanism
– Solenoid coil creates magnetic field
– High fault currents produce strong magnetic force
– Armature pulls mechanically to trip breaker
– Response time: <0.1 seconds for short circuits Manual Reset Operation:
Most 12V breakers feature push-button or switch-type reset mechanisms, allowing users to restore power after clearing the fault condition.
#### Type 1: Push-Button Reset Breakers
- 説明: Red reset button protrudes when tripped
- 最適: Easily accessible locations
- メリット: Visual trip indication, quick reset
- Common Ratings: 5A to 100A
- 典型的な使用例: Marine panels, automotive accessories
#### Type 2: Toggle Switch Breakers
- 説明: Looks like standard switch, flips to off when tripped
- 最適: Control panels requiring switch functionality
- メリット: Dual purpose (breaker + switch)
- Common Ratings: 10A to 50A
- 典型的な使用例: RV electrical panels, equipment controls
#### Type 3: Automatic Reset Breakers
- 説明: Self-resetting after cooling period
- 最適: Inaccessible locations, motor protection
- メリット: No manual intervention required
- Common Ratings: 5A to 40A
- 典型的な使用例: Bilge pumps, cooling fans
#### Type 4: Surface Mount vs. Panel Mount
- Surface Mount: Bolts directly to surface, exposed terminals
- Panel Mount: Installs through panel cutout, protected terminals
- 選択要因: Available space and environmental protection needs
12V DC breakers typically have voltage ratings:
- 12V nominal: Standard automotive/marine systems
- 32V DC maximum: Provides safety margin for voltage spikes
- 48V DC rated: Can be used on 12V systems (over-rated)
重要: Never use a breaker rated below your system’s maximum voltage, including charging voltages (14.4V for 12V systems).
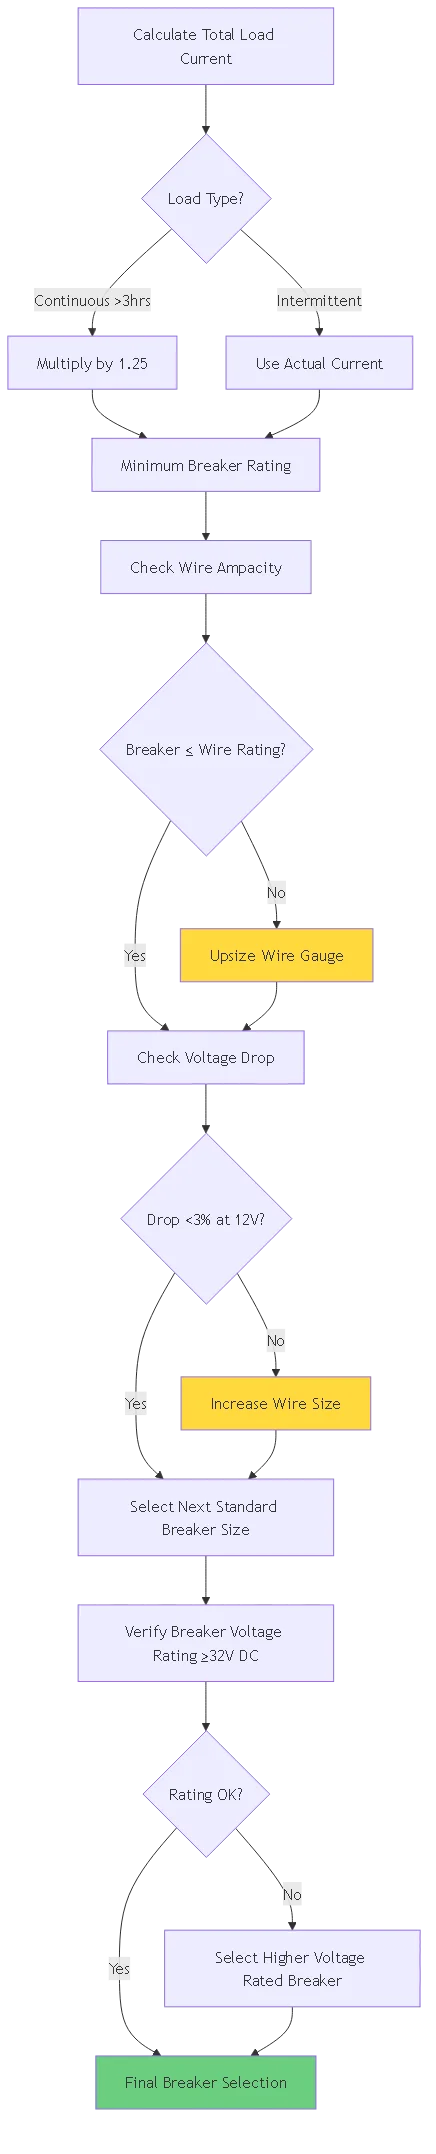
NEC第690条.8 Requirement (applicable to solar/battery systems):
Circuit breaker rating must be at least 125% of maximum continuous current
フォーミュラ:
Breaker Rating (A) = Continuous Current (A) × 1.25
計算例:
– 12V inverter drawing 60A continuous
– Required breaker: 60A × 1.25 = 75A minimum
– Select: 80A breaker (next standard size up)
The breaker must protect the wire, not just the load:
| ワイヤーゲージ(AWG) | Maximum Ampacity | Recommended Breaker |
|---|---|---|
| 18 AWG | 16A | 15A max |
| 16 AWG | 22A | 20A max |
| 14 AWG | 32A | 30A max |
| 12 AWG | 41A | 40A max |
| 10 AWG | 55A | 50A max |
| 8 AWG | 73A | 70A max |
| 6 AWG | 101A | 100A max |
| 4 AWG | 135A | 125A max |
| 2 AWG | 181A | 175A max |
| 1/0 AWG | 245A | 225A max |
クリティカル・ルール: The breaker rating must NEVER exceed the wire’s ampacity rating.
Step 1: Inventory All Loads
Example RV 12V System:
- LED lights: 15A
- Water pump: 8A
- Refrigerator: 12A
- Inverter: 80A
- Fan: 3A
Total: 118A
Step 2: Apply Demand Factor
Not all loads run simultaneously. Use realistic demand:
– Essential loads: 100% (lights, water pump)
– Intermittent loads: 50% (inverter, refrigerator)
Step 3: Calculate Required Breaker
Continuous loads: 15A + 8A = 23A
Intermittent: (80A + 12A) × 0.5 = 46A
Total demand: 23A + 46A = 69A
Required breaker: 69A × 1.25 = 86.25A → Use 100A breaker
At 12V, voltage drop significantly impacts performance:
Voltage Drop Formula:
Voltage Drop (V) = 2 × Length (ft) × Current (A) × Resistance (Ω/ft) / 1000
例
– 10 AWG wire, 20 feet length
– 50A current draw
– Resistance: 1.24 Ω per 1000 ft
Drop = 2 × 20 × 50 × 1.24 / 1000 = 2.48V
12.0V - 2.48V = 9.52V at load (20% drop - UNACCEPTABLE)
ソリューション: Upsize wire to reduce resistance, which may allow smaller breaker due to lower heat generation.
Marine & RV Standards (ABYC/RVIA):
1. Accessibility
– Within easy reach for emergency disconnect
– Height: 3-6 feet above floor level
– Clear labeling visible in dim light
2. 環境保護
– Dry location preferred
– IP67 rated breakers for wet locations
– Covered panel boxes in exposed areas
3. Thermal Clearance
– 2 inches minimum clearance around breaker
- 放熱のための十分な換気
– Away from heat sources (engine, exhaust)
4. Positive Wire Protection
– Breaker on positive (+) side only
– Within 7 inches of battery (NEC 690.71)
– Before any splits or branches
必要な道具
– Wire strippers (12-18 AWG range)
– Crimping tool for terminals
– Multimeter (voltage testing)
– Torque screwdriver (if specified)
– Heat shrink tubing
– Marine-grade terminal connectors
Installation Procedure:
Step 1: Power Isolation
1. Disconnect battery negative terminal
2. Verify 0V across positive terminals with multimeter
3. Wait 5 minutes for capacitor discharge
4. Use insulated tools throughout
Step 2: Wire Preparation
1. Cut wire to length (minimize extra length)
2. Strip insulation 3/8 inch
3. Crimp terminal lugs (use ratcheting crimper)
4. Apply heat shrink over crimp connection
5. Tug test: Pull with 25 lbs force
Step 3: Breaker Mounting
1. Surface mount: Use stainless steel hardware
2. Panel mount: Snap into panel cutout
3. Verify mechanical security (no wobble)
4. Check terminal orientation (positive to load side)
Step 4: Terminal Connections
1. Connect battery side terminal first
2. Tighten to specified torque (typically 15-25 in-lbs)
3. Connect load side terminal
4. Verify no exposed conductors
5. Apply dielectric grease to terminals
Step 5: Testing
1. Reconnect battery negative
2. Check voltage at breaker (should read ~12.6V)
3. Reset breaker to ON position
4. Verify voltage at load side
5. Test trip function (if possible with test button)
6. Label breaker with circuit name and amperage
❌ Mistake 1: Installing breaker on negative side
- Why Wrong: Chassis ground can bypass breaker
- 正しい: Always install on positive wire
❌ Mistake 2: Undersized wire for breaker rating
- Why Wrong: Breaker won’t protect wire from overheating
- 正しい: Wire ampacity ≥ breaker rating
❌ Mistake 3: Multiple circuits on one breaker
- Why Wrong: Impossible to identify faulty circuit
- 正しい: One breaker per circuit
❌ Mistake 4: Using AC-rated breaker for DC
- Why Wrong: AC breakers fail to extinguish DC arc
- 正しい: Only use DC-rated breakers
❌ Mistake 5: No labeling
- Why Wrong: Emergency situations require quick identification
- 正しい: Label with circuit name and amperage
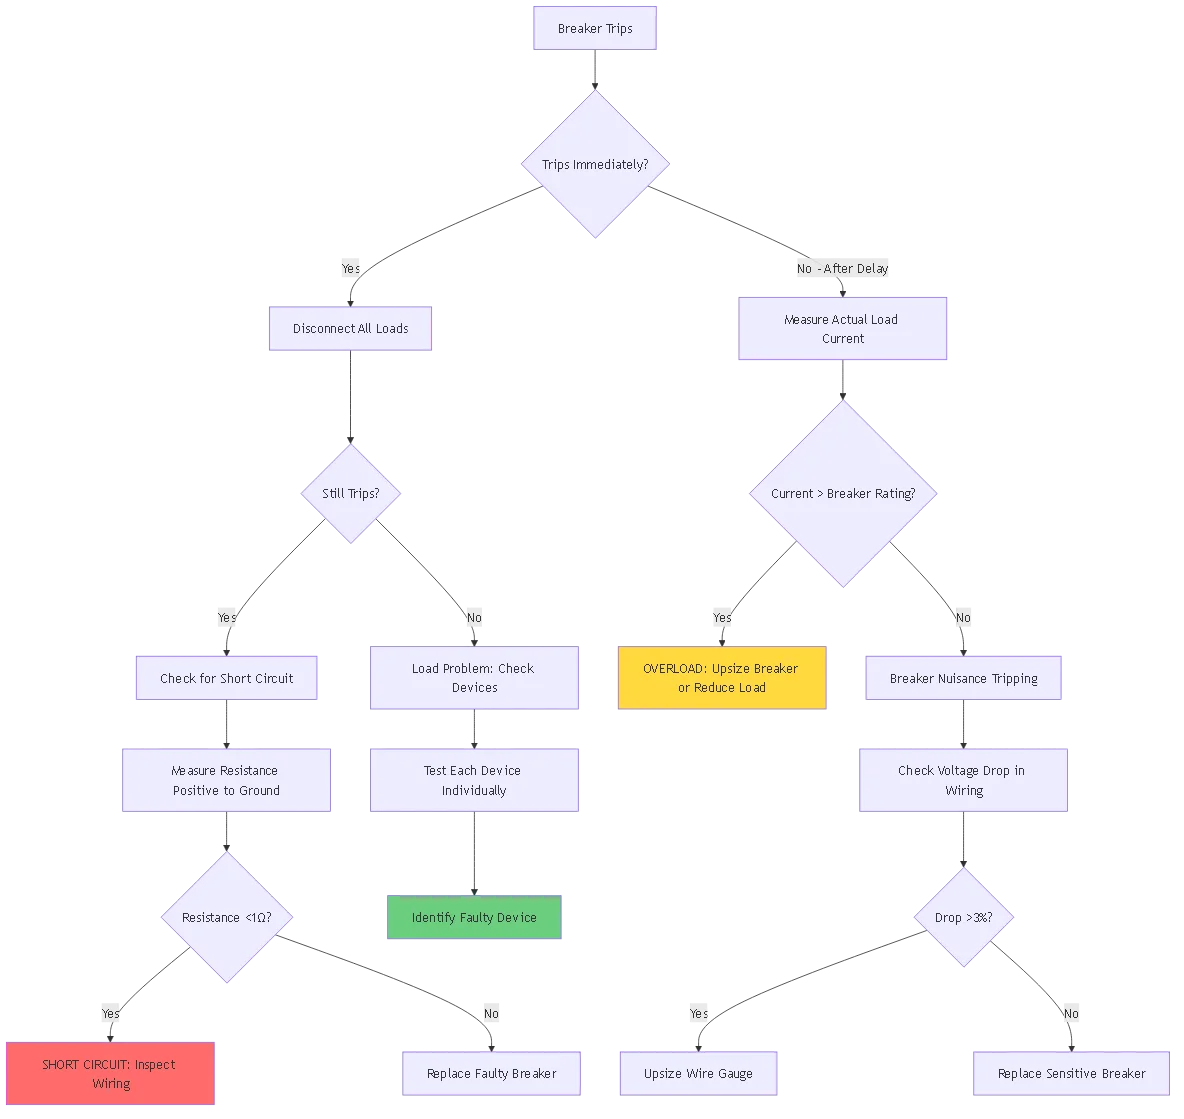
Symptom: Breaker trips immediately upon reset
Diagnostic Procedure:
1. Isolate the Load
– Disconnect all loads from breaker
– Reset breaker
– If holds: Load problem
– If trips: Breaker or wiring problem
2. Measure Load Current
“`
– Use DC clamp meter on positive wire
– Compare to breaker rating
– If >100% rating: Overload condition
– If <80% rating: Breaker failure “`
3. Check for Short Circuits
“`
– Set multimeter to resistance mode
– Measure positive to negative/ground
– Reading <1 Ω indicates short circuit – Inspect wiring for damage/chafing “`
4. Verify Wire Sizing
“`
– Measure wire gauge with gauge tool
– Compare to breaker rating
– Undersized wire causes voltage drop and heat
– Replace with adequate gauge wire
“`
5. Test Breaker Function
“`
– Apply calibrated test load
– Load should be 135% of breaker rating
– Breaker should trip in 1-60 seconds
– If no trip: Replace breaker
“`
考えられる原因
| Symptom | 原因 | ソリューション |
|---|---|---|
| Button stuck out | Mechanical jam | Tap firmly, lubricate pivot |
| Button pushes but won’t latch | Broken latch mechanism | Replace breaker |
| Hot to touch | Thermal lockout active | Cool down 15 min, retry |
| Visible damage | Physical damage | Replace immediately |
Normal Voltage Drop:
– Closed breaker: 0.1-0.3V drop at rated current
– Example: 11.9V input, 11.7V output = 0.2V (acceptable)
Excessive Voltage Drop:
– >0.5V drop indicates problem
– Causes: Corroded terminals, loose connections, internal resistance
– Solution: Clean terminals, tighten connections, or replace
Testing Procedure:
1. Connect voltmeter to battery positive: Record voltage
2. Connect voltmeter to breaker input: Should match battery
3. Connect voltmeter to breaker output: Calculate drop
4. Load circuit to 80% of breaker rating
5. Repeat measurements under load
6. If drop >0.5V under load: Service required
Corrosion Protection:
– Require UL 489 marine rating or IP67
– Stainless steel hardware mandatory
– Conformal coating on circuit boards
– Sealed terminal compartments
ABYC Standards (American Boat & Yacht Council):
– E-11: AC & DC Electrical Systems
– Require ignition protection in gasoline engine spaces
– Breakers within 7 inches of battery
– Color coding: Red (unswitched positive), Yellow (switched positive)
Recommended Brands for Marine:
– Blue Sea Systems (most popular)
– Carling Technologies
– Ancor (marine wire + breakers)
Dual Battery Considerations:
– Separate breakers for house vs. chassis battery
– Battery isolator or combiner circuits
– Solar charge controller integration
120V AC to 12V DC Systems:
– Converter/charger output protection
– Typical ratings: 30-60A for converter output
– Separate breaker for AC input side
Typical RV 12V Breaker Panel Layout:
Main Battery Disconnect: 150-200A
├─ Interior Lights: 15A
├─ Water Pump: 15A
├─ Furnace Blower: 25A
├─ Refrigerator (DC mode): 15A
├─ Inverter: 150A (dedicated)
├─ Slide-Out Motors: 30A
├─ 12V Outlets: 20A
└─ Entertainment System: 20A
Battery Disconnect Requirements:
– Class T fuse or breaker within 7 inches of battery
– Rating: 1.25× maximum charge controller current
– Typical: 80-125A for residential systems
Charge Controller Integration:
– Output breaker protects battery wiring
– Input breaker protects controller from battery
– Must handle startup surge currents
High-Power Audio Systems:
– Breaker near battery mandatory
– Calculate wire size for peak power draw
– Typical: 100-200A for competition systems
Auxiliary Lighting:
– LED light bars: 10-30A typical
– Breaker allows easy on/off without switch
– Inline blade fuse as secondary protection
Winch Circuits:
– 150-300A depending on winch rating
– Dedicated heavy-duty breaker
– Thermal protection critical for long pulls
Monthly Inspection:
– Visual check for corrosion on terminals
- ブレーカーがスムーズにリセットされることを確認
– Check for heat discoloration
– Test for loose connections
Annual Maintenance:
– Clean terminals with electrical contact cleaner
– Apply fresh dielectric grease
– Test trip function under load
– Verify proper current rating labels
5-Year Replacement:
– Marine environments: Replace every 5-7 years
– Automotive: 10+ years typical lifespan
– High-cycle applications: 3-5 years
1. Nuisance Tripping: Trips below rated current repeatedly
2. Won’t Reset: Mechanical failure of latch
3. Delayed Tripping: Takes too long at 135% overload
4. Overheating: Excessive heat generation at normal current
5. Corrosion: Visible terminal corrosion cannot be cleaned
6. Physical Damage: Cracks, burns, melted plastic
– Circuit breakers contain recyclable metals
– Do not dispose in general trash
– Take to electronics recycling center
– Some auto parts stores accept for recycling
Blue Sea Systems 7074 – Surface Mount 50A
- 価格: $25-30
- 特徴: IP67 rated, ignition protected
- 最適: Marine installations
- 保証2年
Carling Technologies 2-5800-203-050
- 価格: $18-24
- 特徴: Magnetic hydraulic trip, 10,000 cycles
- 最適: Commercial equipment
- 保証:3年
Bussman CB185-50
- 価格: $12-16
- 特徴: Surface mount, auto reset option
- 最適: RV panels
- 保証:1年
Eaton / Bussmann 121 Series
- 価格: $8-14
- 特徴: Panel mount, compact design
- 最適: Automotive accessories
- 保証:1年
ANJOSHI 12V Push Button Reset
- 価格: $6-10
- 特徴: Basic thermal protection
- 最適: Non-critical circuits
- 保証: 30 days
Qiorange Inline Waterproof
- 価格: $5-8
- 特徴: IP67 rated housing
- 最適: Outdoor accessories
- 保証: None
Specialized Marine:
– West Marine
– Defender Marine
– Fisheries Supply
RV Specific:
– Camping World
– PPL Motor Homes
– RecPro
General Automotive:
– Amazon (widest selection)
– AutoZone
– O’Reilly Auto Parts
| 特徴 | DCサーキットブレーカー | Automotive Fuse |
|---|---|---|
| Reset | Manual reset | 交換が必要 |
| コスト | $10-30 each | $0.50-2 each |
| Trip time | 5-60 seconds | <0.1 seconds |
| 精密 | ±20% | ±10% |
| ベストユース | Frequent trips expected | One-time protection |
| Convenience | 非常に高い | Low (need spares) |
When to Use Each:
- Breakers: Accessible locations, user-operated circuits
- ヒューズ: Critical safety circuits, backup protection
| 特徴 | サーキットブレーカー | Manual Switch |
|---|---|---|
| Overcurrent protection | Yes | No |
| Manual control | Yes | Yes |
| コスト | より高い | Lower |
| Safety | Automatic trip | Manual only |
ベストプラクティス: Use breaker for protection + separate switch for control (double protection).
1. Can I use a 12V DC circuit breaker on a 24V system?
No, never exceed the voltage rating. A 12V breaker on a 24V system will fail catastrophically and cannot safely interrupt DC arcs at higher voltages. Always use a breaker rated for at least 32V DC for 24V systems, preferably 50V DC rated.
2. Why does my 12V breaker trip when starting my engine?
Engine starter motors draw 200-400A inrush current for 1-3 seconds. If your breaker is protecting accessories on the same circuit, the voltage sag and current spike can cause nuisance tripping. Solution: Install a separate, higher-rated breaker for the starter circuit or use a delayed-trip breaker.
3. What’s the difference between thermal and magnetic trip breakers?
Thermal breakers use a bi-metal strip that bends with heat (5-60 second response), protecting against overloads. Magnetic breakers use a solenoid coil for instant trip (<0.1 seconds), protecting against short circuits. Most 12V breakers combine both technologies (thermal-magnetic) for complete protection.
4. How do I know if my 12V breaker is rated for DC current?
Check the breaker label for “DC” marking and voltage rating (e.g., “32V DC”). AC-only breakers will show “AC” or “~” symbol. Never use an AC breaker for DC applications—AC breakers cannot safely interrupt DC arcs. Look for UL 489 (AC and DC) or UL 1077 (supplementary) markings.
5. Can I parallel two 50A breakers to get 100A capacity?
No, never parallel circuit breakers. Current will not split evenly due to slight differences in internal resistance, causing one breaker to carry more load and trip first. Instead, use a single breaker rated for the full current requirement or install separate circuits.
6. What causes voltage drop across my 12V circuit breaker?
Normal voltage drop is 0.1-0.3V at rated current due to internal contact resistance. Excessive drop (>0.5V) indicates corroded terminals, loose connections, or internal breaker degradation. Clean and tighten all connections; if drop persists, replace the breaker.
7. Should I install a circuit breaker on both positive and negative wires?
No, only install the breaker on the positive (+) wire. The negative wire should connect directly to ground/chassis. Installing a breaker on the negative side provides no additional protection since the chassis is grounded, and a fault can bypass the breaker entirely through the chassis ground path.
Choosing the correct 12 volt DC circuit breaker requires careful consideration of current requirements, wire sizing, environmental conditions, and application-specific needs. Follow these key principles:
Critical Selection Criteria:
1. 現在のレーティング ≥ 125% of continuous load
2. 定格電圧 ≥ 32V DC for 12V systems
3. Wire ampacity ≥ breaker rating
4. 環境保護 (IP rating for wet locations)
5. Interrupting capacity sufficient for your battery bank
Best Practices:
– Size conservatively—don’t exceed 80% breaker rating continuously
– Use marine-grade breakers in corrosive environments
– Label all breakers clearly with circuit name and rating
– Test trip function annually
– Replace breakers every 5-10 years depending on environment
品質対コスト:
For critical safety circuits (bilge pumps, navigation lights), invest in premium brands like Blue Sea Systems. For non-critical accessories (USB chargers, LED strips), mid-range automotive breakers suffice.
By following this comprehensive guide, you’ll ensure reliable electrical protection for your 12V automotive, marine, or RV electrical systems for years to come.
No, never exceed the voltage rating. A 12V breaker on a 24V system will fail catastrophically and cannot safely interrupt DC arcs at higher voltages. Always use a breaker rated for at least 32V DC for 24V systems, preferably 50V DC rated.
Engine starter motors draw 200-400A inrush current for 1-3 seconds. If your breaker is protecting accessories on the same circuit, the voltage sag and current spike can cause nuisance tripping. Install a separate, higher-rated breaker for the starter circuit or use a delayed-trip breaker.
Thermal breakers use a bi-metal strip that bends with heat (5-60 second response), protecting against overloads. Magnetic breakers use a solenoid coil for instant trip (<0.1 seconds), protecting against short circuits. Most 12V breakers combine both technologies for complete protection.
Check the breaker label for ‘DC’ marking and voltage rating (e.g., ’32V DC’). AC-only breakers will show ‘AC’ or ‘~’ symbol. Never use an AC breaker for DC applications—AC breakers cannot safely interrupt DC arcs. Look for UL 489 or UL 1077 markings.
No, never parallel circuit breakers. Current will not split evenly due to slight differences in internal resistance, causing one breaker to carry more load and trip first. Instead, use a single breaker rated for the full current requirement or install separate circuits.
Normal voltage drop is 0.1-0.3V at rated current due to internal contact resistance. Excessive drop (>0.5V) indicates corroded terminals, loose connections, or internal breaker degradation. Clean and tighten all connections; if drop persists, replace the breaker.
No, only install the breaker on the positive (+) wire. The negative wire should connect directly to ground/chassis. Installing a breaker on the negative side provides no additional protection since the chassis is grounded.