住所
304ノース・カーディナル
セント・ドーチェスター・センター(マサチューセッツ州02124
勤務時間
月曜日~金曜日:午前7時~午後7時
週末午前10時~午後5時
住所
304ノース・カーディナル
セント・ドーチェスター・センター(マサチューセッツ州02124
勤務時間
月曜日~金曜日:午前7時~午後7時
週末午前10時~午後5時

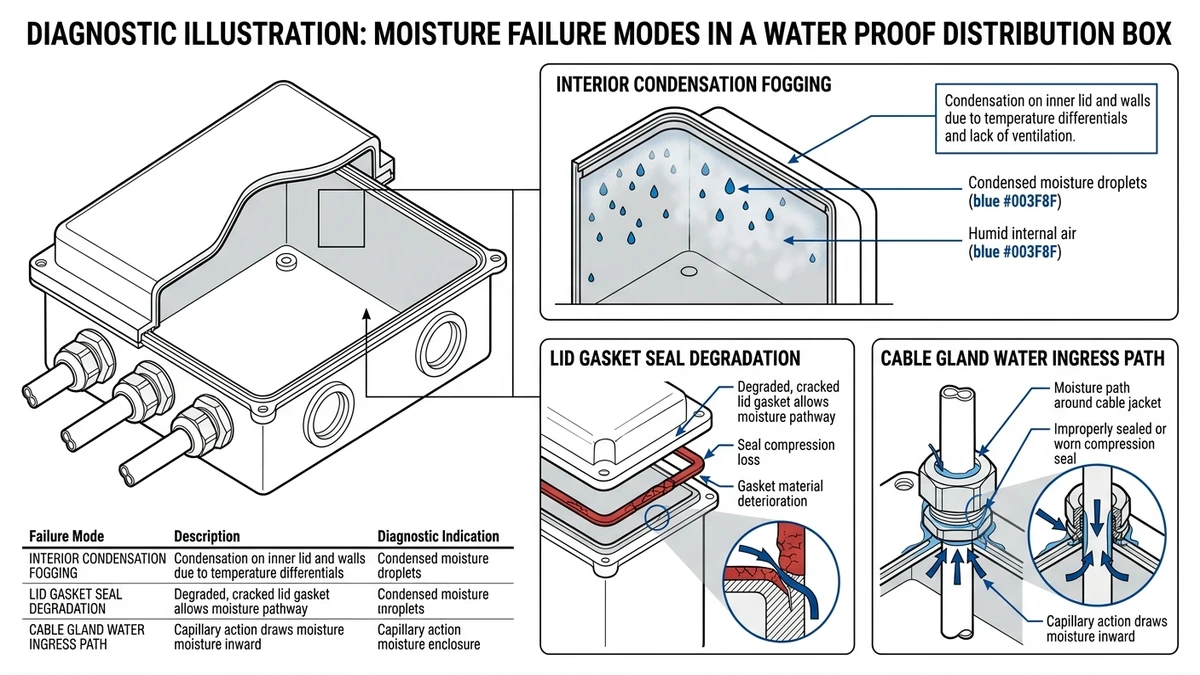
Moisture inside a waterproof distribution box almost always traces back to one of three root causes: seal degradation, condensation buildup, or mechanical breach. Identifying which type you’re dealing with determines the repair path. Most field failures fall into the condensation or seal category, and confusing the two leads to repairs that do not last.
In a 2023 survey of rooftop PV installations across Zhejiang Province covering roughly 200 commercial sites, technicians found that over 60% of reported moisture ingress cases in DC distribution boxes were condensation-driven, not seal failures. Yet many had simply been re-sealed without addressing ventilation, causing repeat failures within 6 months.
Use the following logic to classify the failure before touching any hardware:
Uniform fogging on the inner lid or walls points to condensation. Pooled water near a cable entry or corner points to ingress through a breach.
IEC 60529 defines ingress protection levels. A box rated IP65 resists water jets from any direction; IP67 handles temporary immersion up to 1 m for 30 minutes. If the installation environment exceeds the rated condition, you have a specification mismatch rather than a product defect.
A simple 5–10 kPa positive pressure test using a hand pump and soapy water will reveal active breach points within about 2 minutes. Condensation failures will show no leakage under pressure.
Once the moisture pattern points away from a direct leak, confirm whether temperature cycling is pulling humid air into the enclosure.
Every enclosure contains a fixed volume of air. As ambient temperature rises during the day, that air expands and pushes outward through any micro-gap in the gasket or cable entry. When temperatures drop at night, the air contracts and draws humid outside air back in.
The driving force is straightforward: a 30°C daily temperature swing in a 5-liter enclosure generates an internal pressure differential of approximately 50–100 Pa relative to ambient. That’s enough to overcome the sealing resistance of a degraded IP66 gasket, which typically loses 30–40% of its compression force after 3–5 years of UV and thermal cycling.
In a 12 MW ground-mount PV installation in Zhejiang Province in 2023, maintenance crews found condensation-related tracking faults in roughly 15% of string-level DC distribution boxes, even though the outer seals appeared intact.
A simple dew-point check with a hygrometer inside the enclosure after a cold night supports a condensation diagnosis when relative humidity exceeds 85% and no external water path is found.
The correct solution is a pressure-equalizing membrane vent that matches the enclosure’s protection rating. These vents use expanded PTFE membranes that allow air and water vapor to pass while blocking liquid water ingress.
Installation procedure:
Choose a vent rated for the enclosure’s IP class, with IP66 as a practical minimum for outdoor DCコンバイナーボックス, and a flow rate of at least 10 cm³/s to handle thermal breathing volume.
Install the vent at the highest point of the enclosure wall so liquid water cannot sit against the membrane face.
Seal existing micro-gaps in cable glands and gaskets before fitting the vent. Otherwise, the vent cannot equalize pressure effectively.
If condensation persists, check whether internal heat sources are creating localized hot spots that intensify the breathing cycle.
によると Gore’s technical documentation on ePTFE venting, properly installed membrane vents can reduce internal humidity cycling by up to 70% in sealed outdoor enclosures.
[Expert Insight]
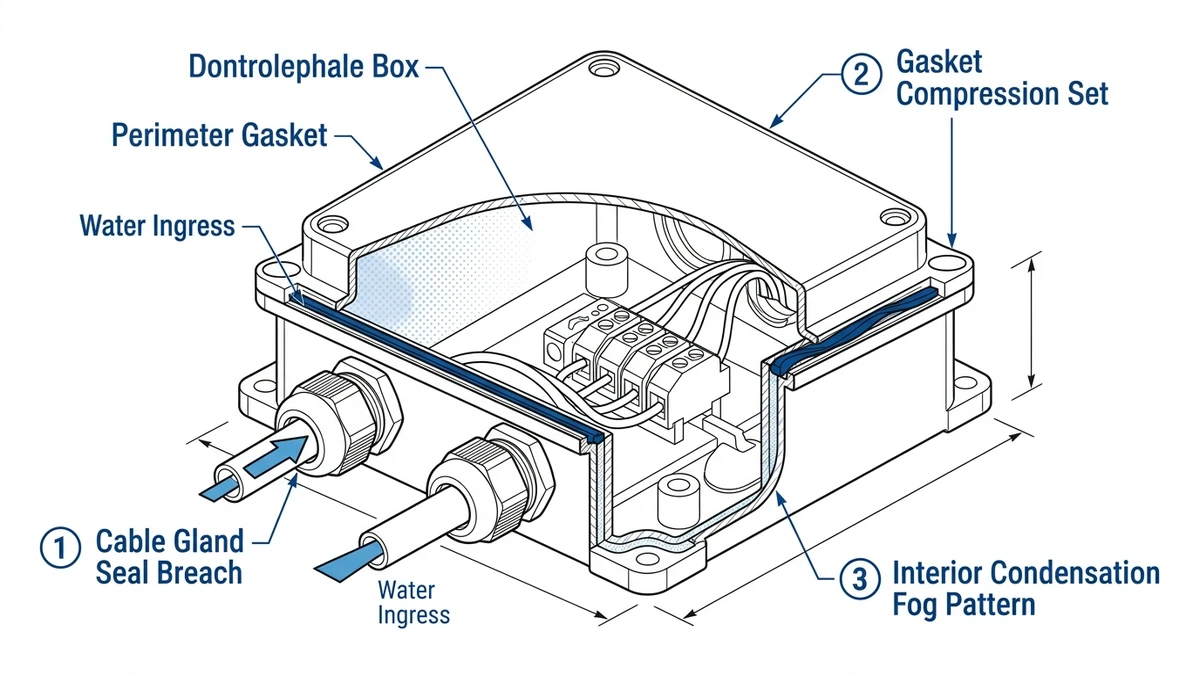
If condensation is ruled out, inspect the lid perimeter next because small gasket losses can drop enclosure performance long before the box itself looks damaged.
Start by cleaning and drying the lid channel and gasket surface, then apply a thin line of talcum powder along the perimeter. Close and latch the lid under normal torque, then expose the enclosure to a directed water spray at 12.5 L/min for 3 minutes using IEC 60529 IPX6 parameters. Re-open and inspect the powder trace: a disturbed or wet section pinpoints the breach.
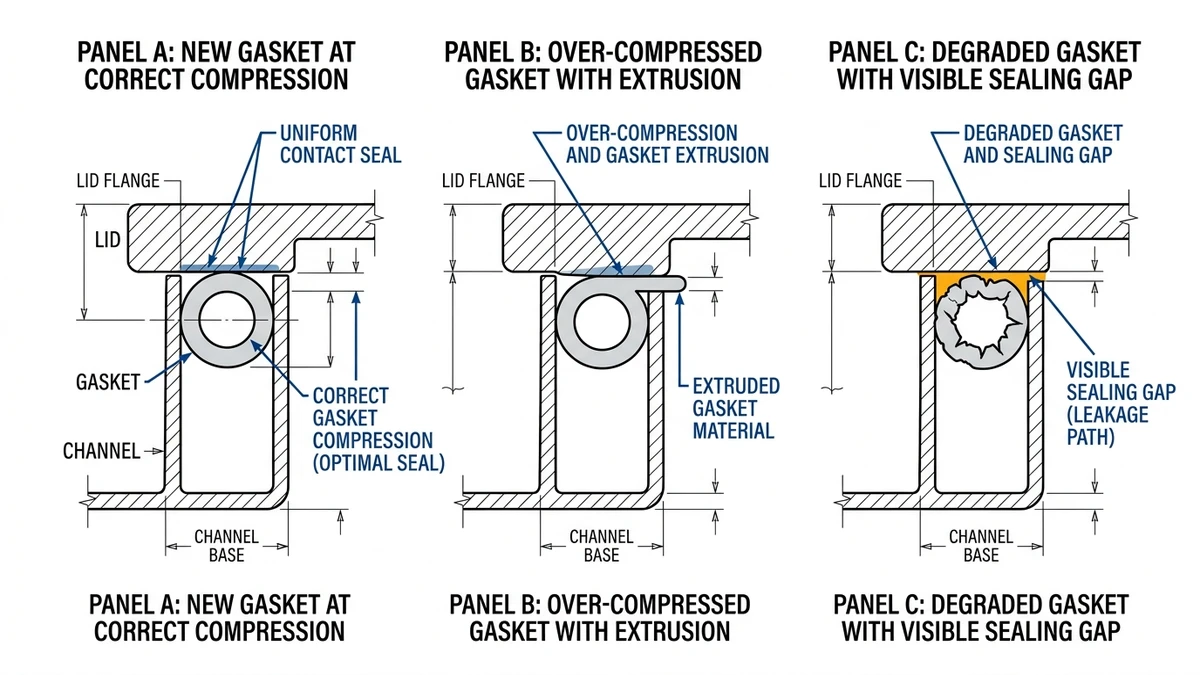
Also check for gasket compression set. A gasket that has lost more than 30% of its original cross-section height will no longer form a reliable seal under standard clamping force.
Choosing the correct replacement material depends on the site environment.
| 素材 | Temp Range | UV/Ozone Resistance | Chemical Resistance | Typical Lifespan | 最適 |
|---|---|---|---|---|---|
| EPDM | −40°C to +120°C | 素晴らしい | 中程度 | 10–15 years | Outdoor, high-UV sites |
| Silicone | −60°C to +200°C | 素晴らしい | グッド | 8–12 years | High-temp industrial |
| Neoprene | −30°C to +90°C | 中程度 | グッド | 5–8 years | General indoor/outdoor |
| Nitrile (NBR) | −40°C to +100°C | Poor | Excellent (oils) | 5–7 years | Industrial, oil-prone |
In a 6 MW rooftop installation across commercial buildings in Zhejiang Province in 2023, EPDM gaskets on combiner enclosures showed no measurable compression set after 18 months of outdoor exposure, while neoprene units on the same roof required replacement within 14 months due to UV cracking.
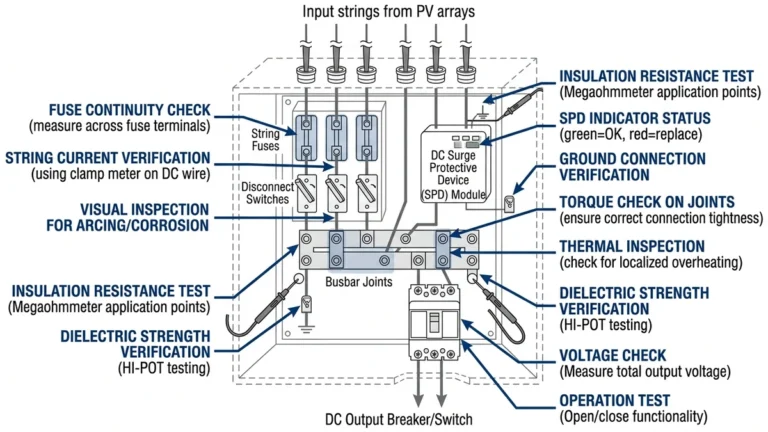
De-energize and lock out the circuit. Verify zero voltage at the 直流開閉器 before opening the enclosure.
Pull the gasket out completely and use a plastic scraper if needed. Avoid scoring the lid channel.
Wipe the channel with isopropyl alcohol and allow it to dry fully.
Fit the new gasket evenly and place any splice joint at a corner rather than along a flat horizontal run where water may collect.
Tighten lid fasteners in a cross pattern to the manufacturer’s specified value, typically 2–4 N·m for M5 stainless hardware.
Repeat the talcum powder spray test to confirm the repair before restoring power.
For enclosures protecting string-level overcurrent components, a failed lid seal is more than a weatherproofing issue. Elevated humidity accelerates thermal degradation of sensitive protective parts.
After the lid seal, cable entries are the most common place to find a true leak because a well-rated enclosure can still fail at a single poorly matched or under-torqued gland.
Cable entry points are among the most overlooked moisture ingress paths during routine inspection. Even a correctly rated IP66 or IP67 enclosure can fail at the gland if the fitting is under-torqued, mismatched to cable diameter, or degraded by UV exposure. IEC 60529 defines the enclosure rating, but field teams still need to follow gland manufacturer torque specifications, typically 2.5–4.5 N·m for M20 cable glands on standard PVC-jacketed cable.
In a 2.4 MW rooftop PV installation in Zhejiang Province in 2023, four distribution boxes showed repeated GFCI trips traced to corroded terminal blocks. Inspection confirmed that M25 glands had been installed on 8 mm cables, leaving enough clearance for capillary water ingress during monsoon season.
Dry the enclosure exterior completely and mark each gland with a number.
Using a focused spray nozzle, apply water at 12.5 kPa to one gland for 60 seconds while keeping all others dry.
Wait 90 seconds, then open the enclosure and inspect for moisture at the base of the tested gland only.
Continue one gland at a time until the leaking entry point is identified.
This isolation method avoids the common mistake of blaming the perimeter gasket when the actual problem is a single loose or mismatched gland.

[Expert Insight]
Once the ingress path is identified, decide whether the enclosure can be safely recovered or whether internal contamination has already caused irreversible damage.
Insulation resistance testing is the most reliable field method for assessing moisture damage severity. Use a 500 VDC or 1000 VDC megohmmeter between phase conductors and the enclosure earth terminal.
Measurement thresholds (per IEC 60364-6 verification testing guidelines):
In a 15 MW rooftop PV project in Zhejiang Province in 2023, maintenance crews used this threshold protocol across 48 distribution boxes after a typhoon event. Boxes reading below 0.5 MΩ showed visible carbonization on busbar supports, matching the conclusion that dielectric degradation had become irreversible.
| コンディション | IR Reading | Seal Damage | Corrosion Level | Decision |
|---|---|---|---|---|
| Minor condensation, no pooling | ≥ 1 MΩ | Gasket compression loss only | なし | Repair: replace gasket, dry, reseal |
| Pooled water, no arc marks | 0.5–1 MΩ | Cable gland failure | Surface oxidation | Repair: replace glands, clean terminals, retest |
| Pooled water + arc tracking | < 0.5 MΩ | Multiple entry points | Moderate–heavy | Replace enclosure |
| Submersion or flood exposure | Any | Full perimeter breach | Heavy | Replace enclosure |
| Enclosure rating degraded (IP67→IP54) | Any | Housing crack or warp | Any | Replace enclosure |
For boxes housing 直流ヒューズ or surge protective components, use a stricter replacement threshold of IR below 1 MΩ rather than 0.5 MΩ, because moisture contamination can impair protective performance before severe tracking is visible.
After any repair, re-verify enclosure integrity with a pressure decay test or visual verification against IEC 60529 ingress criteria before returning the circuit to service.
Most repeat failures come from inspection intervals that do not match the stress level of the site.
An IP66-rated box installed in a high-humidity tropical zone will usually degrade faster than an IP55 box in a controlled indoor environment. UV exposure hardens elastomer seals, salt-laden air attacks gasket adhesion, and thermal cycling causes cumulative compression set. A 20 MW ground-mount PV installation in Hainan Province in 2023 found that combiner boxes in coastal rows needed gasket replacement 18 months earlier than identical units installed 2 km inland.
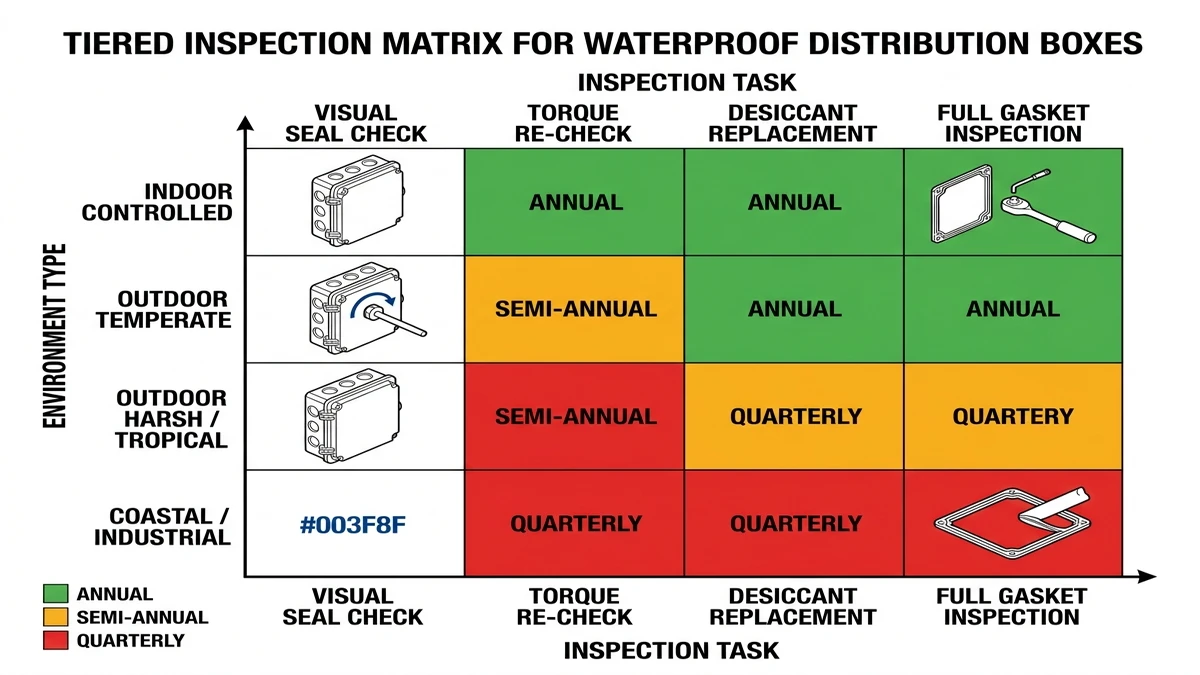
| Environment Type | Visual Seal Check | Desiccant/Breather Check | Gasket Compression Test | Full Disassembly Inspection |
|---|---|---|---|---|
| Indoor controlled (≤60% RH) | 年間 | Every 24 months | Every 36 months | Every 5 years |
| Outdoor temperate | Semi-annual | 年間 | Every 18 months | Every 3 years |
| Outdoor harsh / tropical (>80% RH) | Quarterly | Every 6 months | 年間 | Every 2 years |
| Coastal / industrial (salt fog, chemical) | Quarterly | Every 3 months | Every 6 months | 年間 |
During each scheduled check, verify cable gland torque against the manufacturer’s specified range, typically 2.5–5 N·m for M20 glands. Confirm that any pressure-compensation breather remains unobstructed. For boxes housing 直流ヒューズ または サージ保護装置, also inspect for corrosion on terminal contacts.
Log every inspection with the date, findings, and corrective action. Trend data often reveals a weak gasket batch or recurring gland issue before it develops into a wider system fault.
After a repair, enclosure selection determines whether the same failure mode will return at the next rainy season or thermal cycle.
IP ratings under IEC 60529 define two levels of protection: the first digit covers solids ingress, and the second covers water ingress. For outdoor DC distribution applications, IP65 is the minimum practical threshold. Coastal, washdown, or high-humidity installations should typically move up to IP66 or IP67.
In a 2.4 MW rooftop PV installation across six industrial buildings in Zhejiang Province in 2023, enclosures downgraded from IP67 to IP65 during a cost-reduction phase showed seal degradation within 14 months under monsoon exposure, roughly twice as fast as the IP67 units on the same roof.
IP rating alone is not enough. Enclosure body material and gasket compound must also match the thermal and UV conditions of the site. Polycarbonate housings typically handle –40°C to +120°C, while standard EPDM gaskets begin to compress-set under sustained high-temperature exposure. In high-UV environments, UV-stabilized GRP outperforms standard ABS over a long service life.
If the current enclosure has already failed at the seal, replacing it like-for-like may simply repeat the same problem. Sinobreaker’s 直流配電ボックス range is rated to IP66/IP67 with UV-stabilized enclosures and replaceable EPDM gaskets for outdoor PV and ESS environments. Pair with properly rated 直流遮断器 to improve long-term reliability.
A waterproof enclosure can still accumulate moisture through condensation, degraded seals, or badly matched cable glands. The box rating only holds when the enclosure, fittings, and installation conditions all stay within specification.
Condensation usually appears as even fogging or film across internal surfaces, while leaks tend to create localized wet spots or pooling near an entry path. Pressure testing and spray-isolation testing help confirm the difference.
Usually not. Sealant may hide the symptom for a short time, but it will not correct thermal breathing, a worn gasket, or an oversized gland.
As a general rule, readings below 0.5 MΩ indicate severe moisture-related damage, while boxes protecting sensitive DC protective devices should be replaced below 1 MΩ. Final judgment should also consider visible tracking, corrosion, and flood exposure.
That depends on the environment. Temperate outdoor sites may only need semi-annual checks, while coastal or industrial locations often justify quarterly inspections.
For recurring temperature-driven humidity cycling, membrane vents are usually the more durable solution because they manage pressure equalization continuously. Desiccants can help in limited cases, but they require monitoring and replacement.
Using a gland that does not match the actual cable jacket diameter is one of the most frequent errors. Even a small mismatch can leave a capillary path that defeats the enclosure’s rated protection.